This article explains how to create a Remote Backup on a My Cloud.*END
IMPORTANT:
My Cloud OS 3 End of Support Notice!
My Cloud OS 3 has reached its end of support life cycle.
Please update to My Cloud OS 5.
Need more help?
 |
Critical:
My Cloud OS3 and My Cloud OS5 Remote Backups are not compatible.
|
- The Remote Backup feature will backup selected data on a My Cloud device to another My Cloud device located on another network
- The "Source" (Remote Backup Client) is the My Cloud device that has the data to be backed up
- The "Destination" (Remote Backup Server) is the My Cloud device that will store the backed up data
- The destination My Cloud should have Cloud Access, iTunes Server and DLNA Media Server disabled to prevent indexing of backup content
- If Cloud Access and Media Serving is required, confgure backups to use the "TimeMachineBackup" or "Smartware" default backup shares
- The backup shares are not indexed by the Cloud service or the Twonky DLNA Server increasing backup performance
- My Cloud remote backup to 3rd party network products are not supported
To create a Remote Backup on a My Cloud device, follow the instructions below:
 |
Important: Prior to setting up the destination device, ensure that the following steps have been taken:
- All of the data on the destination device is backed up in a separate location
- The destination device has the latest firmware version
- The router that the device is connected to supports UPnP and UPnP is enabled
- The following instructions are NOT applicable to My Cloud devices running V4 firmware
- My Cloud NAS single bays units with V2 Firmware require a My Cloud Mirror or Higher to be the destination location
- My Cloud(s) must be configured with a static IP addresses
- My Cloud(s) must be set to Port Forward mode and not in Relay mode (Relay Mode is not supported)
- My Cloud(s) must be connected to a UPnP enabled router with internet connection or on the same network
My Cloud ---> UPnP Router ---> INTERNET <--- UPnP Router <--- My Cloud
My Cloud ---> UPnP Router <--- My Cloud
- View the Use of Third-Party Software or Websites disclaimer.
Western Digital Support cannot help with third-party software or hardware.
|
| A- Configure the Destination My Cloud (Remote Backup Server)
|
Instructions |
| Enabling SSH |
Step A1 |
| Enabling Remote Server |
Step A2 |
| Configuring Port Forwarding for Remote Backup |
Step A3 |
| Obtaining the WAN IP Address |
Step A4 |
| Disable Content Scanner Services |
Step A5 |
| B- Configure the Destination Router (only needed if router does NOT support UPNP or Network is Double NAT) |
Instructions |
| Router Does NOT Support UPnP and Network is Double NAT |
Step B |
| C- Create a Remote Backup Job on the Source My Cloud (Remote Backup Client) |
Instructions |
| Create the Job |
Step C1 |
| Start the Job |
Step C2 |
| Validating Backed up data |
Step C3 |
| What is the difference between copy and synchronize |
Step C4 |
IMPORTANT:
- The following instructions are NOT applicable to single bay My Cloud with v04.xx.xxx firmware
- My Cloud single bay units with v2.xx.xxx firmware require a My Cloud Mirror or Higher to be the destination location
Configure the Destination My Cloud (Remote Backup Server)
Step A1 - Enabling SSH
|
Critical:
The use of SSH and commands are not supported by Western Digital Technical Support Team. Modifying operating system files are not recommended and are not supported. Changes to the operating system files will be reverted to the original file after a power cycle.
|
-
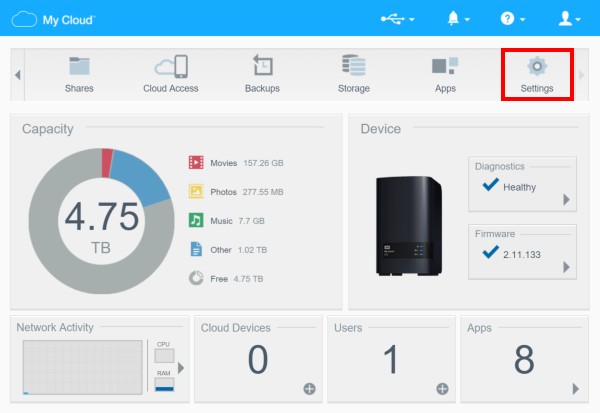
From the main page of the My Cloud destination device Dashboard, click the Settings button of the Navigation bar. For assistance accessing the Dashboard, please see Answer ID 10420: How to access the Dashboard on a My Cloud.
-
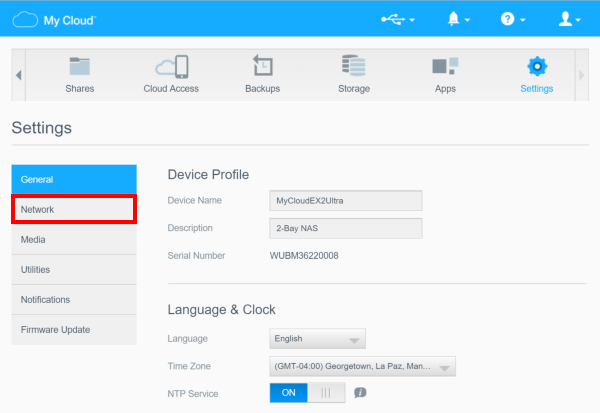
Once inside the Settings area, click on the Network option on the left-side panel.
-
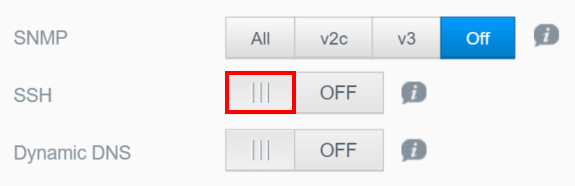
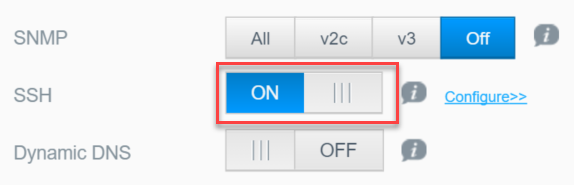
The SSH option is located under Network Services of the Network area. It is set to Off by default. To enable it, click on top of the Off button.
-
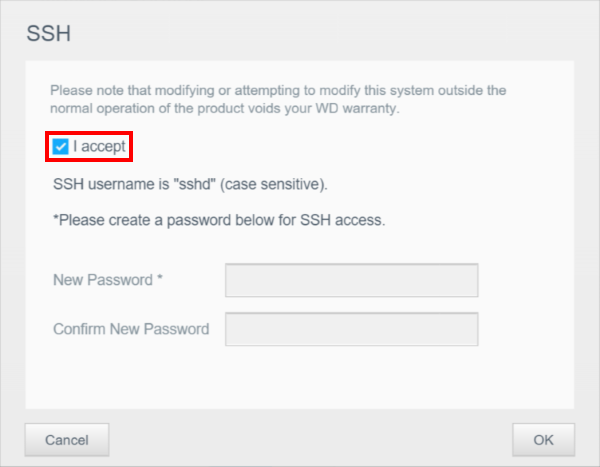
When SSH is turned On, a pop-up window will display to accept the terms for using SSH, as well as request for the User to select a Password for accessing the device through SSH. The User Name is sshd, and the Password will be the designated by the Administrator of the device. To proceed, check the I accept checkbox by clicking on it, and click on OK.
-
SSH is now enabled on the device.
Return to Top
Step A2 - Enabling Remote Server and Create Remote backup share
IMPORTANT:
Backup content hosted in a User Created or Public Share will be crawled, indexed and thumbnails created increasing CPU, Memory and System Load on the backup destination. Disable of the indexing services is recommended when the backup destination is a User Created or Public share. The default Smartware share does not have its content indexed and can serve as a remote backup destination folder when remote access to other content is required. For instructions, please refer to Answer ID 5080: My Cloud OS 3: Disable and Enable Indexing and Media Services
-
From the main page of the My Cloud destination device Dashboard, click the Settings button of the Navigation bar. For assistance accessing the Dashboard, please see Answer ID 10420: How to access the Dashboard on a My Cloud.
-
Once inside the Settings area, click on the Network option on the left-side panel.
-
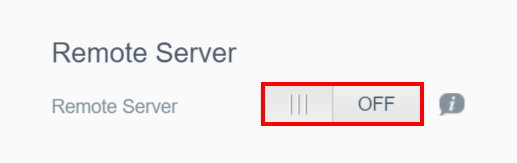
The Remote Server option will be located towards bottom half of page. It is set to Off by default. To enable it, click on top of the Off button.
-
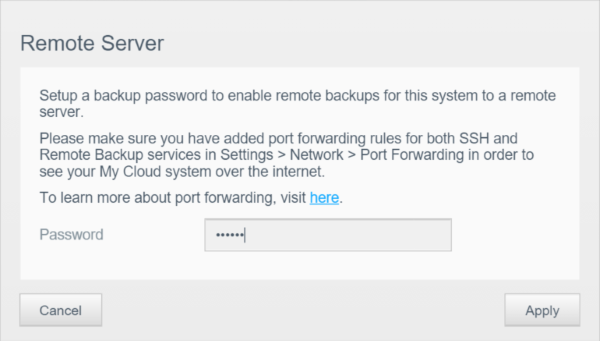
When Remote Server is turned On, a pop-up window will display a message about rules for Port Forwarding. Read this message, and in the Password field, enter the password that was created for SSH access. To proceed, check the Save button.
-
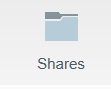
Navigate to the Shares tab
-
Click the folder icon(+) to create

-
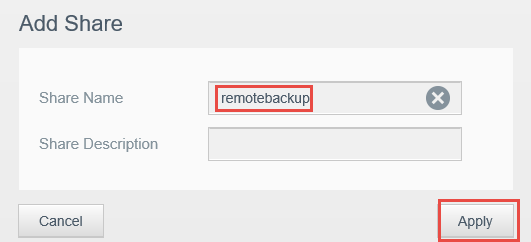
Name the share: remotebackup and click Apply
-
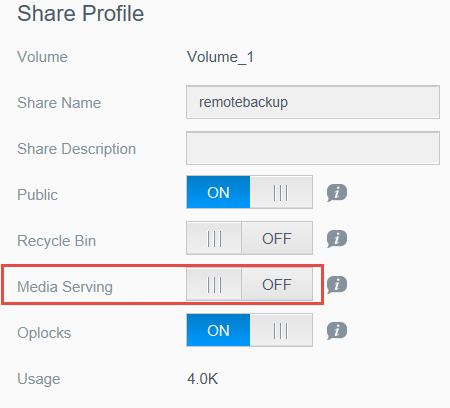
Ensure that Media Streaming is turned off to improve remote backup performance
Return to Top
Step A3 - Configuring Port Forwarding for Remote Backup
-
From the main page of the My Cloud destination device Dashboard, click the Settings button of the Navigation bar. For assistance accessing the Dashboard, please see Answer ID 10420: How to access the Dashboard on a My Cloud.
-
Once inside the Settings area, click on the Network option on the left-side panel.
-
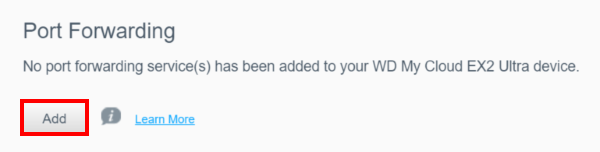
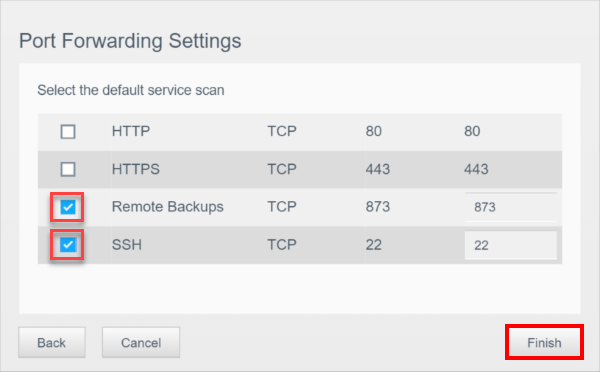
The Port Forwarding option is located at the bottom half of the page. Click Add to see the Port Forwarding settings.
-
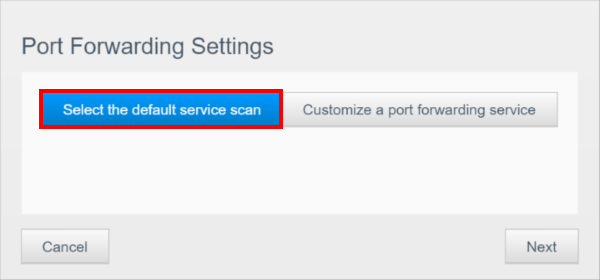
When Port Forwarding settings are seen click Select the default service scan then click Next.
-
Click Finish.
Return to Top
Step A4 - Obtain the WAN IP Address
IMPORTANT:
If the Remote Backup is being configured between two My Cloud devices connected to the same local network router, use
the LAN (Local Area Network) Static IP address of the destination My Cloud and not the WAN (Wide Area Network) IP Address as indicated in the steps below.
-
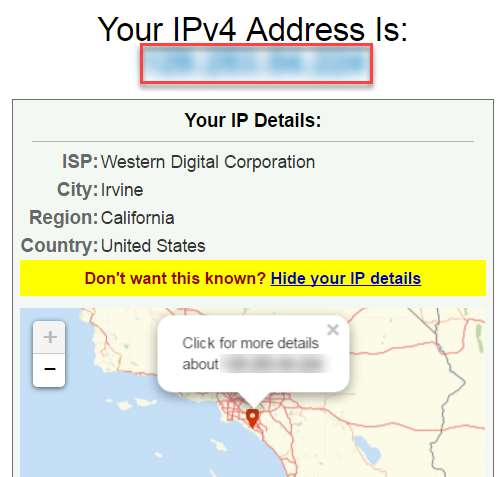
Visit What is my IP Address
-
Please make a note of the WAN IP address on the screen.
It will be used to configure Remote Backups on the souce My Cloud.
Return to Top
Disable Content Scanner Services
IMPORTANT:
User created shares are indexed by the My Cloud Media Crawler, Twonky DLNA Media Server and iTunes Server.
When using a
user created share for Remote Backups, it is highly recommened to disable the My Cloud scanning services. If the destination My Cloud is not a dedicated remote backup server, the TimeMachineBackup and Smartware
backup shares can be used as the remote backup destination. These "Backup Shares" are not crawled or indexed by the My Cloud services.
The following are services on the My Cloud that use content scanners
- My Cloud Access
- Twonky
- iTunes
To disable content scanning services, please refer to
Answer ID 18625 How To Disable and Enable My Cloud Indexing and Media Services
For more information regarding slow backups please refer to Answer ID 17243 Common Causes of Slow Backups
Return to Top
Router Does NOT Support UPnP and Network is Double NAT
IMPORTANT:
Western Digital Technical Support DOES NOT provide remote backup troubleshooting support on a double NAT'd network configuration. Technical Support is not provided for Router to Router port forward configuration, troubleshooting or verification services.
Configuring the Router (If UPnP is not supported or Double NAT)
For assistance with UPnP please contact your ISP (Internet Service Provider) or router manufacturer. If the router does not support UPnP please contact your ISP or router manufacturer to configure manual port forwarding on the router. Alternatively, you can goto Port Forward;and select your router's brand and model number to get instructionson how to configure port forwarding on your router.
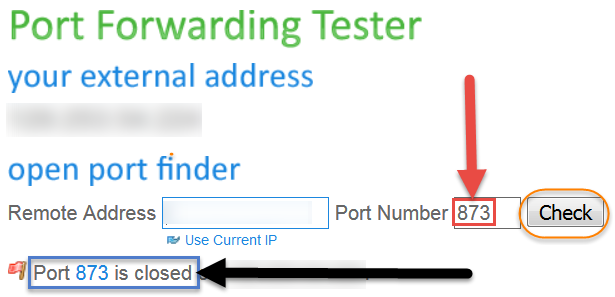
The two ports needed are 22 (SSH) and 873 (Remote Backups)
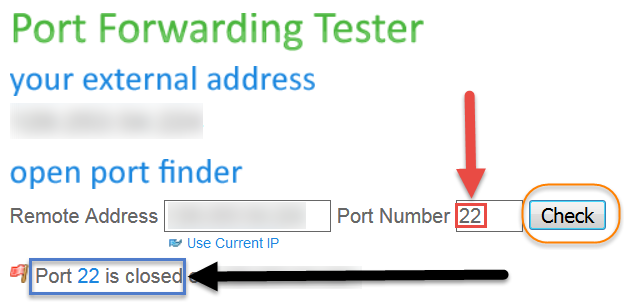
Go to You Get Signal Port Forwarding Tester and enter the WAN IP Address, and ensure that ports 22 and 873 are open
If the ports are listed as closed then contact the ISP and verity if they can open the port(s)
Double NAT
Double NAT is when you have multiple routers in your setup. Example My Cloud is connected to Router 1 and Router 1 is connected to Router2.
Western Digtital does not support Double NAT configurations
Example of Double NAT:

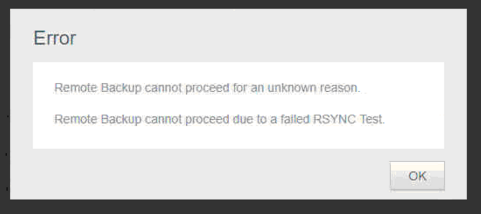
Error: Remote Backup cannot proceed for an unknown reason. or Remote Backup cannot proceed due to a failed Rsync test. When creating a Remote Backup Job on the Source My Cloud (Remote Backup Client)
Go to You get signal Port Forwarding Tester and verify that ports 22 and 873 are open. If the ports 22 and 873 are closed please contact the ISP at the Destination network and verify if they can open the ports?
Return to Top
C- Create a Remote Backup Job on the Source My Cloud (Remote Backup Client)
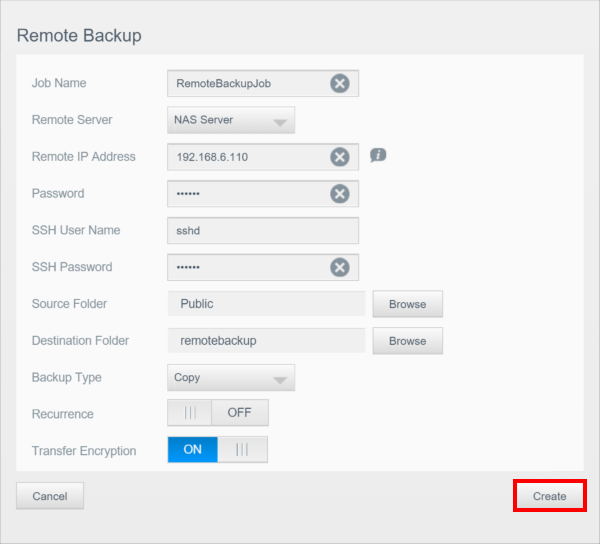
Step C1 - Create the Job
-
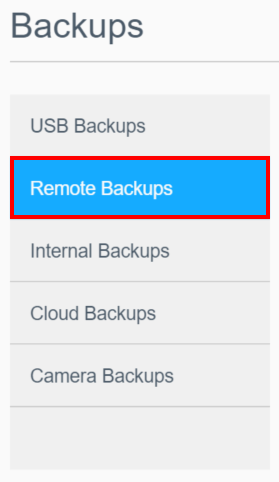
In the dashboard, go to Backups.

-
From the list of backups on the left-side panel, click Remote Backups.
-
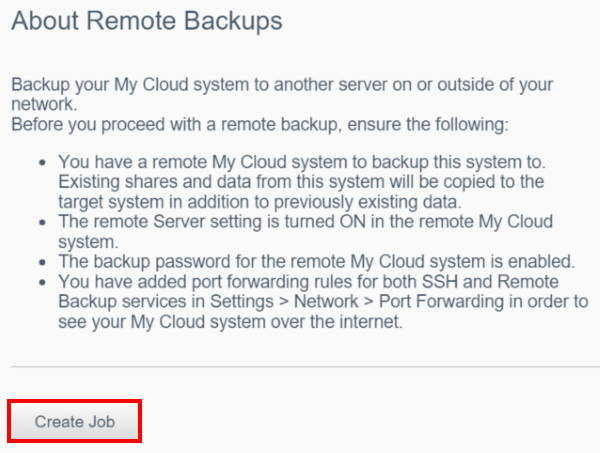
In About Remote Backups, click Create Job.
-
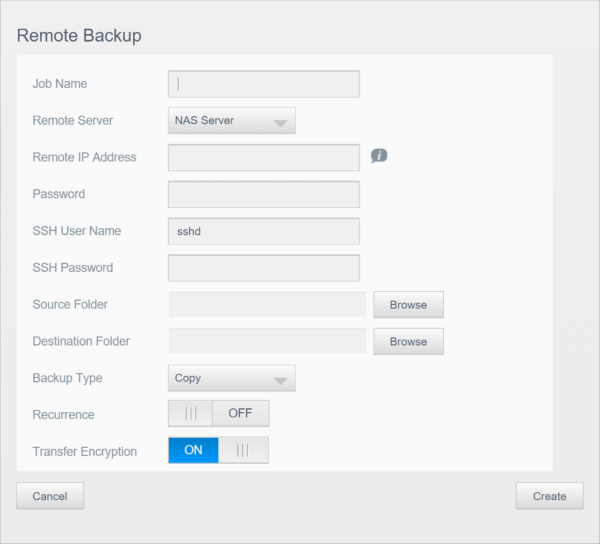
The Remote Backup window appears.
-
In Job Name, enter a name for the backup job.
-
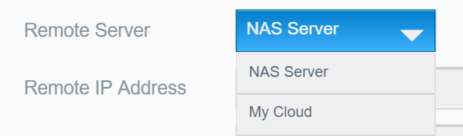
In Remote Server, click the drop-down arrow to choose NAS Server.
-
In Remote IP Address, enter the destination device's WAN IP Address (Routers External IP Address) obtained from Step A4.
IMPORTANT:
If the Remote Backup is being configured between two My Cloud devices connected to the same local network router, use
the LAN (Local Area Network) Static IP address of the destination My Cloud and not the WAN (Wide Area Network) IP Address.
-
In Password, enter the remote backup password which was created when Enabling Remote Server.
-
In SSH Password, enter the SSH password which was created when Enabling SSH.
-
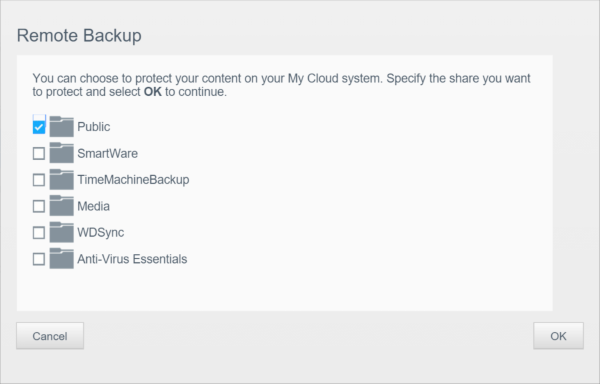
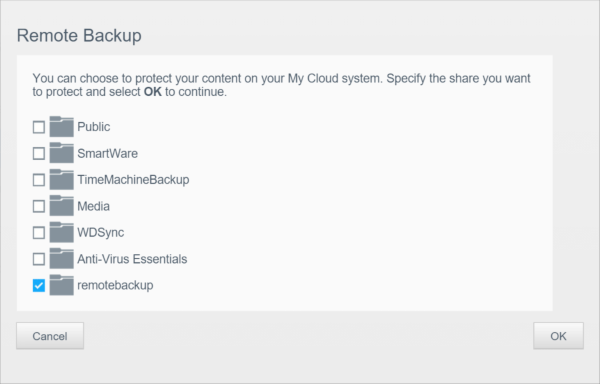
In Source Folder, click Browse.
A list of the source shares will appear.
-
Select the source share that will be backed up.
-
Click OK.
-
In Destination Folder, click Browse.
A list of the destination shares will appear.
-
Select the destination share that the data will be backed up into.
Note:
|
The user may also click New to create a new share in the destination device. |
-
ClickOK
-
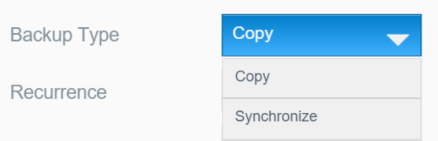
In Backup Type, click the drop-down arrow to select one of the following:
-
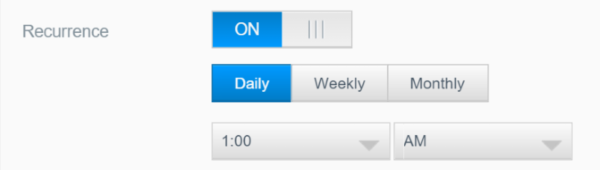
Set Recurrence to On to set up a recurring schedule.
-
Click Create.
The settings will be displayed.
Return to Top
Step C2 - Start the Job
Under Remote Backup Jobs, the status of the backup job is displayed.

Return to Top
Step C3 - Validating Backed up data
When the backup is completed you can validate the sata is on the destination

-
Go to destination device
-
Open the share that was chosen or created in step 1C-14
-
Validate data is backed up in the share
Return to Top
Step C4- What is the difference between Copy & Synchronize
Copy: Copy the files from the source to the destination. Extra files on the destination will not be deleted, files of the same names will be overwritten.
Synchronize Mode: Copy the files from the source to the destination. Extra files on the destination will be deleted, files of the same names will be overwritten by the source. Source data will remain unchanged.
Can I use MyCloud.com credentials to configure a Remote Backup?
When configuring a Remote Backup, an alternative to manually configuring the Remote Server's IP address is to use MyCloud.com credentials. If the Destination My Cloud is registered for MyCloud.com its Public IP information will be automatically populated into the appropriate fields.
-
From the Remote Backup Configuration click the Remote Server drop down and choose My Cloud
-
Enter the email and password credentials for MyCloud.com
-
Select the Destination My Cloud from the list of My Cloud device's associated with the MyCloud.com credentials
-
The Remote Server's IP address should automatically be populated
Return to Top