The default memory config for a My Cloud DL2100, DL4100,
and PR4100 can be upgraded to improve the overall performance.
IMPORTANT:
My Cloud models not listed here cannot be upgraded.
My Cloud DL2100
- 1GB RAM Onboard - Non ECC
- Upgradable to 5GB
- Single rank UDIMM
These modules are approved for upgrading memory.
Kingston
KVR16N11S8/4
4GB
240 Pin
UDIMM
PC3-12800 CL11
Kingston
KVR13N9S8/4
4GB
240 Pin
UDIMM
PC3-10600 CL9
My Cloud DL4100
- 2GB RAM Onboard - Non ECC
- Upgradable to 6GB
- Single rank SODIMM
These modules are approved for upgrading memory.
Kingston
KVR13S9S8/4
4GB
204 Pin
SODIMM
PC3-10600
Hynix
HMT451S6BFR8A-PB
4GB
204 Pin
SODIMM
PC3L-12800
My Cloud PR4100
Memory of a My Cloud PR4100 can be upgraded to 16 GB.
 |
Critical: View the Warranty Policy before upgrading memory. |
Need more help?
My Cloud PR4100 User Manual
- 4GB RAM - 2GB+2GB DDR3L
- Upgradable to 16GB
- Two rank SO-DIMM slots
These modules are approved for upgrading memory.
| Memory | Module | Part Number |
|---|---|---|
| 2GB | Innodisk SO-DIMM | M3SW-2GSJCL0C-QDM |
| 2GB | Samsung SO-DIMM | M471B5674EB0-YK0 |
| 4GB | Crucial SO-DIMM | CT51264BF160B |
| 4GB | Kingston SO-DIMM | KVR16LS11/4 |
| 8GB | Kingston SO-DIMM | KVR16LS11/8 |
| 4GB | Micron SO-DIMM | MT16KTF51264HZ-1G6M1 |
| 8GB | Micron SO-DIMM | MT16KTF1G64HZ-1G6E1 |
| 4GB | Hynix SO-DIMM | HMT351S6CFR8C-PB |
| 8GB | Hynix SO-DIMM | HMT41GS6AFR8A-PB |
 |
My Cloud should be powered off prior to module replacement and an anti-static wristband should be worn to prevent static damage to the unit. |
Tools
- Phillips screwdriver
- Replacement SO-DIMM Memory module
Replace SO-DIMM Module
- Power off and the device and remove all external connections.
- Place it on a clean and stable surface with the back of the unit facing you.
- Release three screws on the back of the unit.
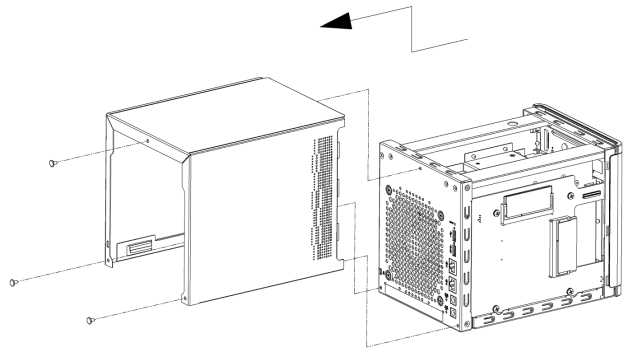
- Pull the unit cover toward you and up to release the cover.
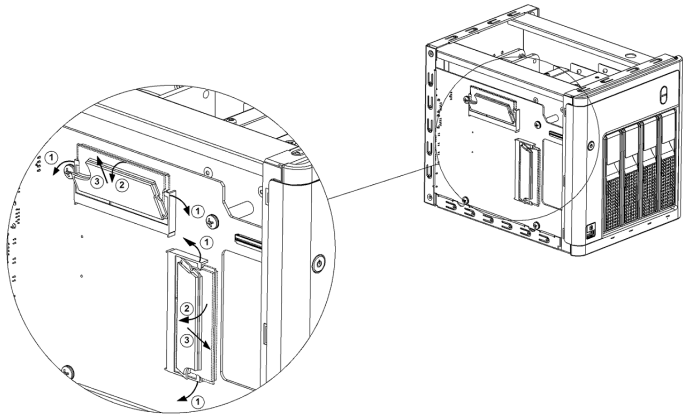
- Remove and replace the SO-DIMM memory module.
- Replace the cover and tighten the three screws once the pair of SO-DIMM modules have been changed.
- Be careful not to touch or damage components when putting the cover back.
- Do not over-tighten the screws.
- Re-connect anything that was disconnected.
- Restart the device.
|
This device uses memory modules in coordinated pairs. |
|
|