IMPORTANT:
Please ensure that your My Cloud product firmware is up to date.
For assistance with updating My Cloud firmware, please refer to Answer ID 10440 How to update the firmware on a My Cloud device
Description
The iSCSI target is no longer available in the dashboard.

The iSCSI configuration file may have become unreadable.
Resolution
| Topic | Instructions |
|---|---|
| Dashboard Option | Click here for Instructions |
| SSH Command Line Option | Click here for Instructions |
| Data Recovery | Click here for Instructions |
SSH Command Line Option
Follow the steps below to enabled SSH on the My Cloud and recreate the iSCSI target.
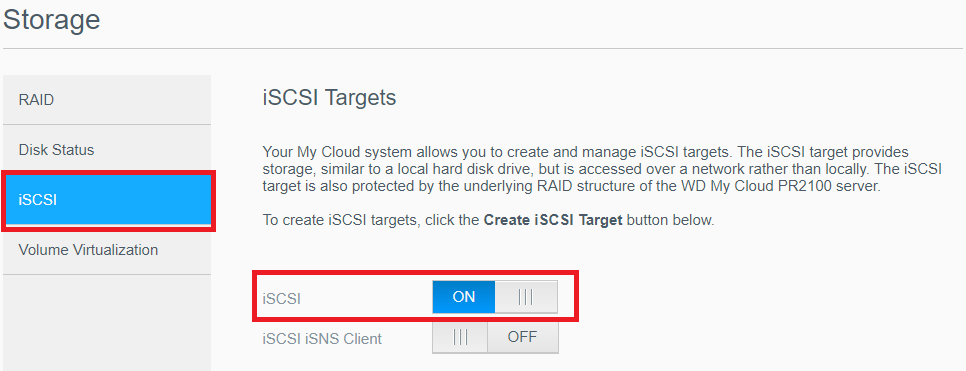
- Enable iSCSI Target in the AdminUI Dashboard.
- Click the Storage tab
- Select iSCSI
- Enable SSH and Access the My Cloud.
For instructions, please refer to Answer ID 26497: How to Access WD My Cloud Using SSH (Secure Shell) - Use the cd command and go to the iSCSI image directory.
cd /mnt/HD/HD_a2/.systemfile/iscsi_images
- Use the List command to get the name of the lost iSCSI image.
Your image name will be different.
EXAMPLE: the target name of the “pr2100.img” will be “pr2100”
ls
EXAMPLE OUTPUT:

- Use the cat command to get the volume name where the images are located.
IE: If the content of the /etc/shared_name is "Volume_1 = HD_a2" ; this means the volume name of /mnt/HD/*HD_a2*/.systemfile/iscsi_image is the “*Volume_1*”.
cat /etc/shared_name
EXAMPLE OUTPUT:

- Restore the LUN.
Your command will be different from the example used below.
EXAMPLE COMMAND: iscsictl --add_lun -L target_name -F /absolute/path/to/the/iscsi/image/file -V volume_name -p 1
IE: To create a LUN for 'pr2100' on 'Volume_1', the following command will be used.
iscsictl --add_lun -L pr2100 -F /mnt/HD/HD_a2/.systemfile/iscsi_images/pr2100.img -V Volume_1 -p 1
IMPORTANT:If the LUN already existings, the command will exit with and error.
LUN Name: pr2100 Already Exist
EXAMPLE OUTPUT:
(src.c:task_add_lun:678): add new lun failed, error code = -9989

- Create the iSCSI target.
Your command will be different from the example used below.
EXAMPLE COMMAND: iscsictl --add_target -n target_name
IE: To create a LUN for 'pr2100', the following command will be used.
iscsictl --add_target -n pr2100
IMPORTANT:If the Target already existings, the command will exit with and error.
Target Name: pr2100 Already Exist
EXAMPLE OUTPUT:
(src.c:task_add_target:660): add new target failed, error code = -9989

- Create a LUN maping between the new iSCSI target and restored LUN.
Your command will be different from the example used below.
EXAMPLE COMMAND: iscsictl --add_lun_to_target -n test2 -L test2
IE: To create a LUN maping for 'pr2100', the following command will be used.
iscsictl --add_lun_to_target -n pr2100 -L pr2100
EXAMPLE OUTPUT:

- Check the AdmiUI Dashboard and the iSCSI Target List should be populated again.
Dashboard Option
Manually reconfigure the iSCSI configuration file.
Follow the steps below to rebuild the iSCSI configuration file that will link to the existing iSCSI image already on the disk.
- Power OFF and ON the unit
- Enable SSH and Access the My Cloud
For instructions, please refer to Answer ID 26497: How to Access WD My Cloud Using SSH (Secure Shell) - Use the cd command and go to the iSCSI image directory
- Use the List command to get the name of the image
Your image name will be different - Use the du -sh command to get the size of the image file
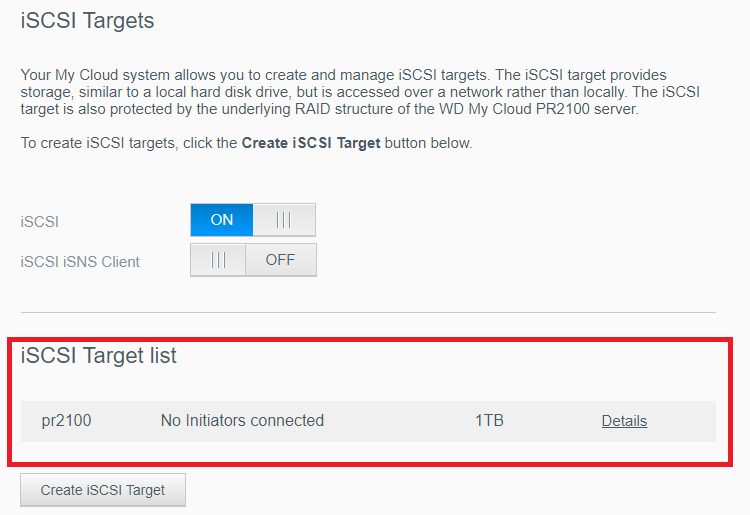
Your image size will be different - Go to Storage > iSCSI in the dashboard
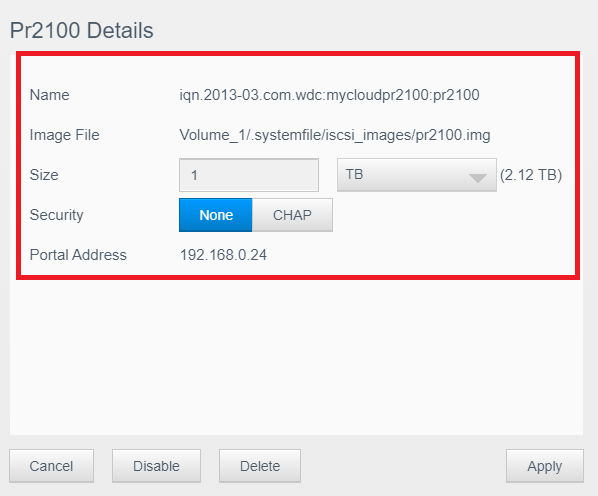
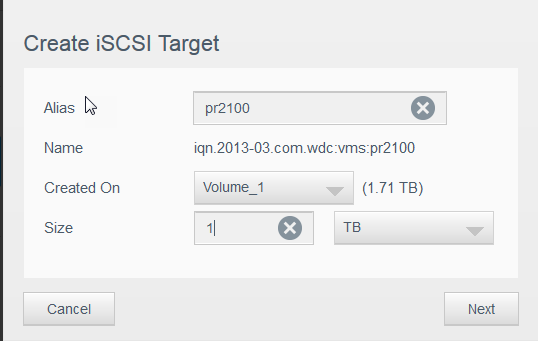
- Create a new iSCSI target using the exact same name of the iSCSI image file. IMPORTANT:
- The name must be identical, case sensitive, to the original iSCSI target name.
- EXAMPLE:
pr2100 and pr21oo are two different iSCSI image names. - If the name of the new iSCSI target is not identical to the name of the image file on the disk, a brand new disk image file will be created if there is enough available disk space.
The goal of the recovery process is to only create the iSCSI definition in the dashboard and not to create a new image on the drive. - The new iSCSI target will assume the size of the disk image when created.
- There must be enough available space on the disk to create the new image definition in the dashboard.
Free up space on the drive as needed. - The size of the volume must be higher than the number 0, and should be a whole integer equal or larger than the actual image size found from the previous step.
- For a 932 G image, create a 1 TB iSCSI image of the same name
- For a 1.9 T image, create a 2 TB iSCSI image of the same name
- For a 2.9 T image, create a 3 TB iSCSI image of the same name
- For a 3.9 T image, create a 4 TB iSCSI image of the same name
- etc...
cd /mnt/HD/HD_a2/.systemfile/iscsi_images
ls
EXAMPLE OUTPUT:
du -sh /mnt/HD/HD_a2/.systemfile/iscsi_images/pr2100.img
EXAMPLE OUTPUT: 932G /mnt/HD/HD_a2/.systemfile/iscsi_images/pr2100.img

Data Recovery Options
- If the iSCSI target does not mount and the iSCSI image is present on the unit, transfer this image to an external storage location and use a third party utility to read the contents of the image.
WD does not provide support for 3rd party software. - If the iSCSI target continues to fail to mount, and the data is needed, please visit one of our data recovery partners
IMPORTANT:Western Digital does not perform data recovery services.
Contact one of our Data Recovery Partners.Any agreement you may reach with the service provider is a matter between you and the service provider. Western Digital makes no warranty, express or implied, regarding the services provided by the service provider, including but not limited to, any warranty regarding the quality or reliability of services performed by it. Your selection of the service provider is at your own risk. Western Digital assumes no liability for any loss or damages of any kind that relate to, arise out of or result from the performance of services by the service provider, including, but not limited to any loss of data contained on a Western Digital hard drive.
Need more help?
Western Digital Warranty Policy
 | Using a 3rd party FTP/SSH client software, such as WinSCP (For Window), or FUGU SSH (For Mac) in order to facilitate locating and transferring the iSCSI image to an external location. Windows 8, 8.1, and 10 may be able to mount this iSCSI image automatically, or Disk Utility from Mac. 7-Zip has also been effective in reading iSCSI images. |
Delete the iSCSI Image
If the iSCSI target does not mount, the data is not needed, the image can be deleted using the rm -rf command.
 |
Critical: The following process is Data Destructive. All data in the iSCSI image will be deleted. |
- Use the rm -rf command to force the deletion of the iSCSI image
rm -rf /mnt/HD/HD_a2/.systemfile/iscsi_images/pr2100.img
View the Use of Third-Party Software or Websites disclaimer.
Western Digital Support cannot help with third-party software or hardware.