My Cloud Home supports Windows, macOS and 3rd party backup software using the local public network share.
Use the table listed below to ensure the appropriate backup is contained in the recommended network share.
Time Machine and Windows Backup to the remote access desktop mounted user share is not supported.
Acronis TrueImage for WD is not supported for backups to a My Cloud Home.
IMPORTANT:
- Apple File Protocol (AFP) is no longer supported on My Cloud Home firmware 7.16.0-217 and higher. For more information, please refer to Answer ID 32004: Steps to Resolve Time Machine Backup Disk Not Available, Finder Connection Error on My Cloud OS 5 or My Cloud Home.
- DO NOT configure backups to use the indexable password protected Private share.
- If the Windows computer Network Browse does not display network drives, type the path to your My Cloud Home in the "Network Bar"
to view and access the Public Share for selection.
EXAMPLE:
\\MYCLOUD-XXXXXX
* Where XXXXXX is the last 6 digits of the My Cloud Home seriel number
For more information, please refer to Answer ID 24978: My Cloud, My Cloud Home or Network Drive: Windows 10 & 11 File Backup Does Not See Device
| OS | Protocol | My Cloud Home Share | NETBIOS Network Path | IP ADDRESS Network Path |
|---|---|---|---|---|
| Windows | SMB | Public | \\MYCLOUD-XXXXXX\Public | \\196.8.1.10\Public |
| macOS | SMB | TimeMachineBackup | smb://MYCLOUD-XXXXXX/TimeMachineBackup | smb://192.168.1.20/TimeMachineBackup |
| Windows 11, 10 and 8.x File History Backup | Click here for Instructions |
| Windows 7 Backup and Restore | Click here for Instructions |
| macOS Time Machine | Click here for Instructions |
| Alternate 3rd Party Backup Software | Click here for Instructions |
| Backup Troubleshooting and Solutions | Click here for Instructions |
Windows 11, 10 and 8.x File History Backup
File History is a built-in, continuous backup tool of Windows 8 and Windows 10. Its basic function is to periodically back up the User’s Libraries (Documents, Music, Pictures and Videos) to another hard drive.
Supported OS Versions
Backup to a network share is supported on the following versions
- Windows 11 Home, Pro, Enterprise, Education
- Windows 10 Home, Pro, Enterprise, Education
- Windows 8.1 Pro, Enterprise
- Windows 8, Pro, Enterprise
For more information on how to use Windows backup, please refer to:
- Backup and Restore in Windows 10
- Microsoft Help Article 17128 File History in Windows
- Article 17143 Backup and restore your files
Windows 8, 8.1 and 10 Backup Procedure
View the Use of Third-Party Software or Websites disclaimer.
Western Digital Support cannot help with third-party software or hardware.
 |
Western Digital is committed to providing our customers the best possible service and support. Windows Backup is a Microsoft product and the best place to get support for using Windows Backup is with Microsoft. In the event that Microsoft is unable to resolve your issue or determines that the issue is caused by a problem with the drive, WD can assist with replacing the drive and diagnosing issues with the device. |
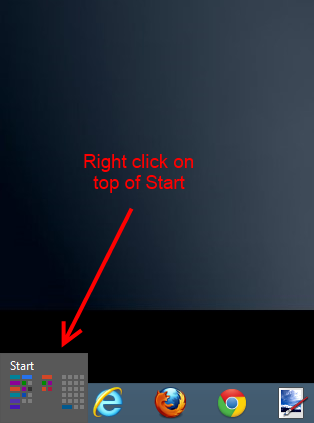
- Move the mouse to the bottom left corner of the desktop to make the Start icon to appear. Then, right click on the mouse.
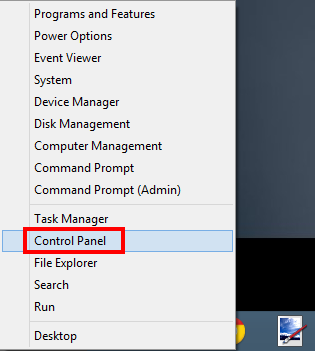
- Right-clicking on top of Start will display a list of options. From the list open Control Panel.
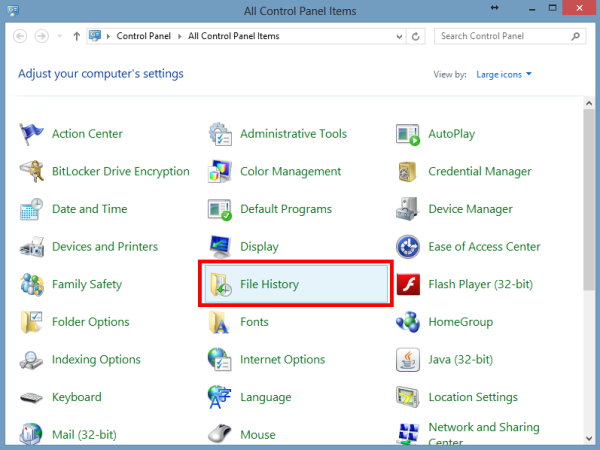
- On the Control Panel window, click on File History.
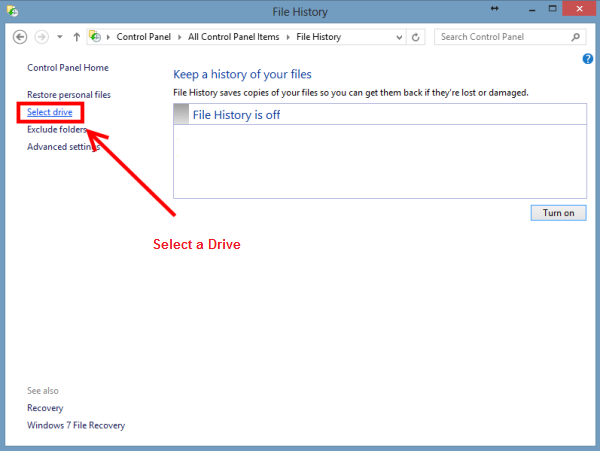
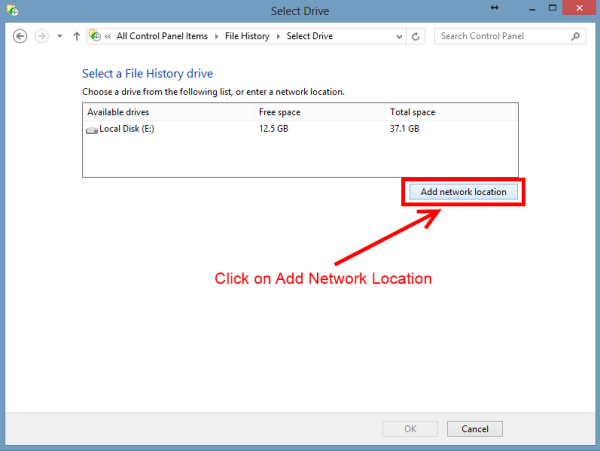
- On the File History window, click on Select Drive, located on the left-side panel.
- The available drives will be listed. Click on Add network location to search for network drives to add to the list.
- From the list of network drives, double click into MYCLOUD-XXXXXX
IMPORTANT:Network Drives may not appear when using a Windows 10 Computer because CIFS/SMBv1 and Network Browse has been depreciated. For more information, please refer to Answer ID 25436: How to Map a WD Network Drive on Windows 11 and Windows 10
If the Network Browse does not display network drive, type the path to your My Cloud Home in the "Network Bar" to view and access the Public Share for selection.
EXAMPLE:
\\MYCLOUD-XXXXXX
* Where XXXXXX is the last 6 digits of the My Cloud Home seriel number
For more information, please refer to Answer ID 24978: My Cloud, My Cloud Home or Network Drive: Windows 10 & 11 File Backup Does Not See Device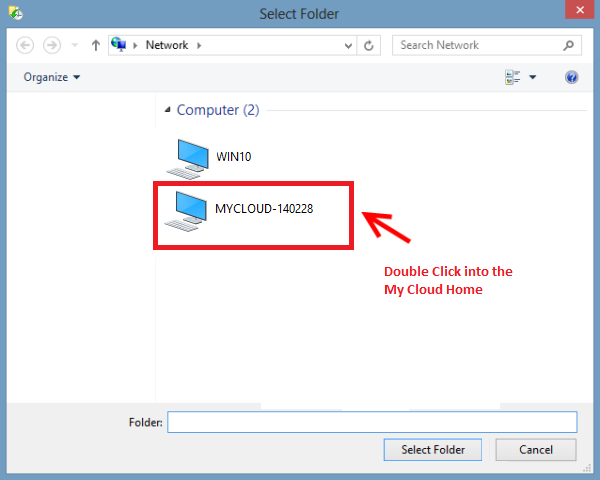
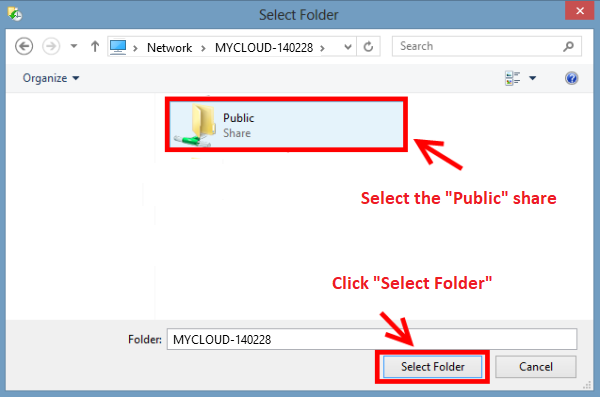
- The available shares within the network drive will be listed.
Select the Public share to hold the File History backup and click Select Folder.
If local network access is enabled on My Cloud Home. Select the local access folder. For more information on local network access please refer to Answer ID 34991: How to Enable Local Network Access to Data on My Cloud Home Using the Dashboard with Cloud Services.
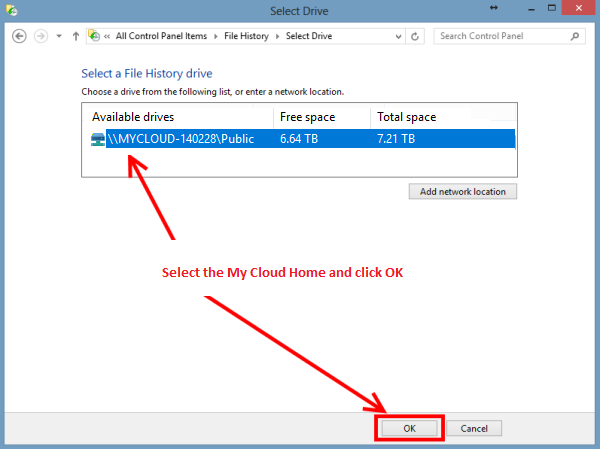
- The selected share will be listed as an available drive. Select it and click on Ok.
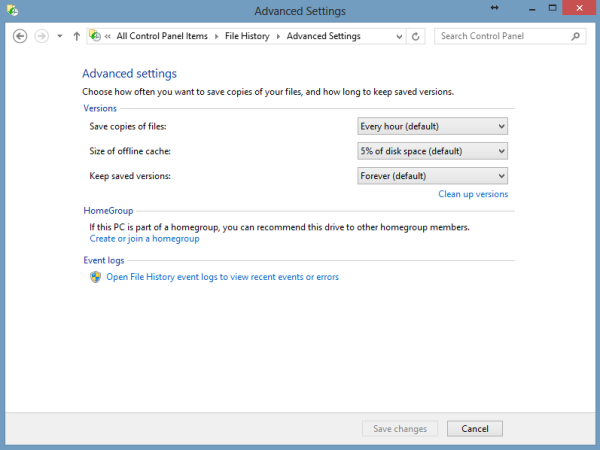
- Once selected, File History will start saving copies of the files into the designated drive. For more options on how File History behaves, click on Advanced Settings on the left-side panel.
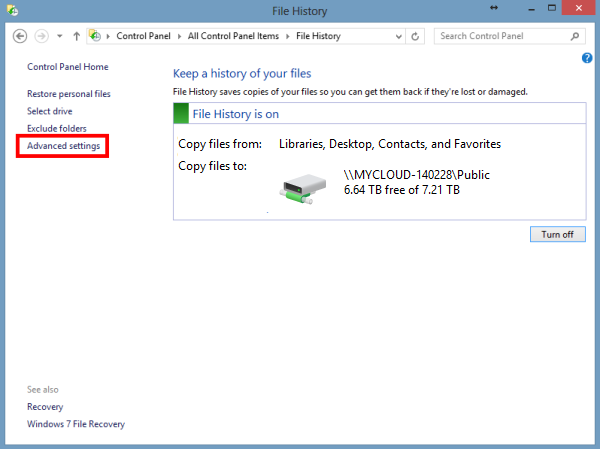
- Under Advanced Settings, different options can be altered, such as how often the backup occurs and how long the files are stored for.
- Leave the backup running until it finishes. The File History panel will display the time when the last backup was made.
Windows 7 Backup and Restore
Supported OS Versions
Backup to a network share is supported on the following Windows 7 versions.
- Windows 7 Home Starter, Basic, Premium
- Windows 7 Pro, Enterprise, Ultimate
** For more information regarding Windows 7 versions that do not support the backup to a network share, please contact Microsoft Support
** For more information on how to use Windows backup, please refer to Microsoft Help Article 17127 Back up and restore your PC
Windows 7 Backup Procedure
Backup and Restore is a component of Microsoft Windows that allow users to create backups and restore from backups created earlier.
View the Use of Third-Party Software or Websites disclaimer.
Western Digital Support cannot help with third-party software or hardware.
|
Western Digital is committed to providing our customers the best possible service and support. Windows Backup is a Microsoft product and the best place to get support for using Windows Backup is with Microsoft. In the event that Microsoft is unable to resolve your issue or determines that the issue is caused by a problem with the drive, WD can assist with replacing the drive and diagnosing issues with the device. For assistance replacing the device, please see Answer ID 10336: Steps to Get a Warranty Replacement, Power Supply, or USB Cable |
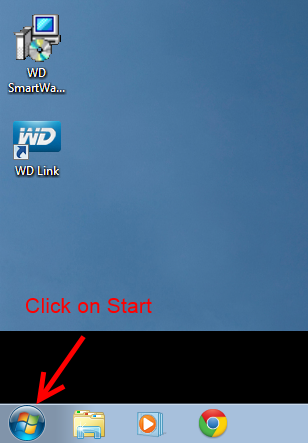
- Click on Start.
- Click on Control Panel.

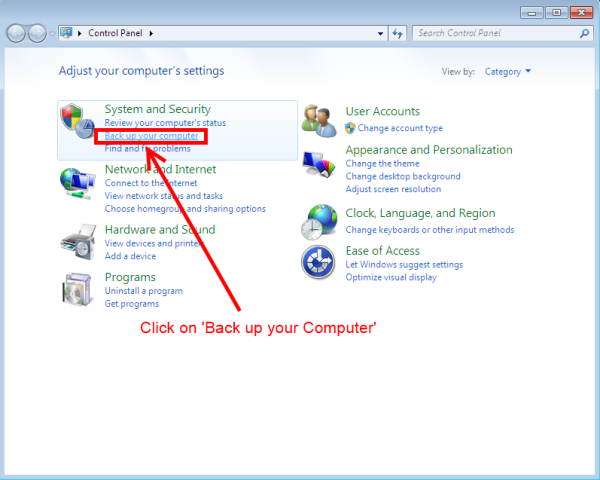
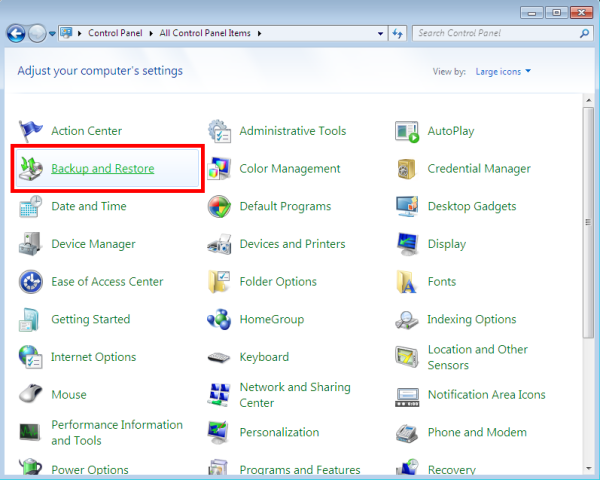
- In Control Panel, click on Back up your computer under the System and Security area.
Alternatively the option will be Backup and Restore, depending on the layout on Control Panel.
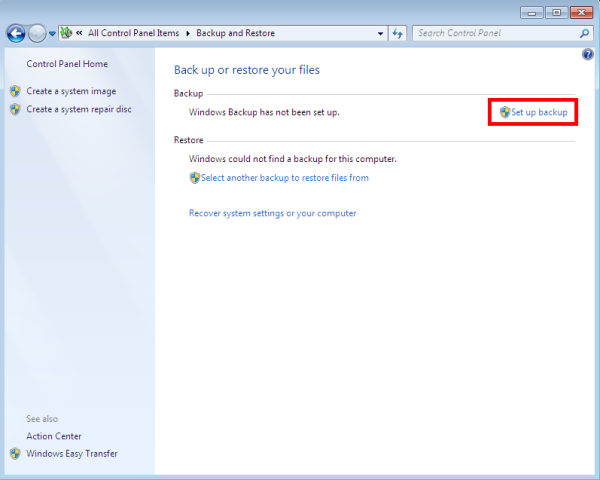
- Once in the Backup and Restore area, click on Set up backup on the top-right of the screen.
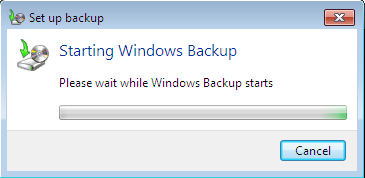
- The Starting Windows Backup pop-up will appear. Wait for the Windows Backup wizard to start. This may take a few seconds.
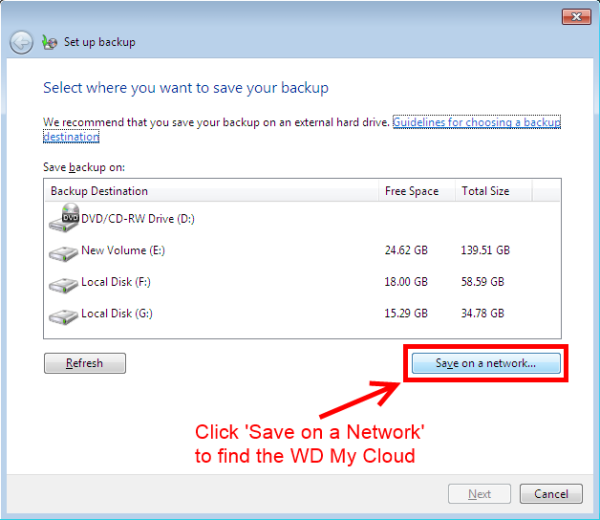
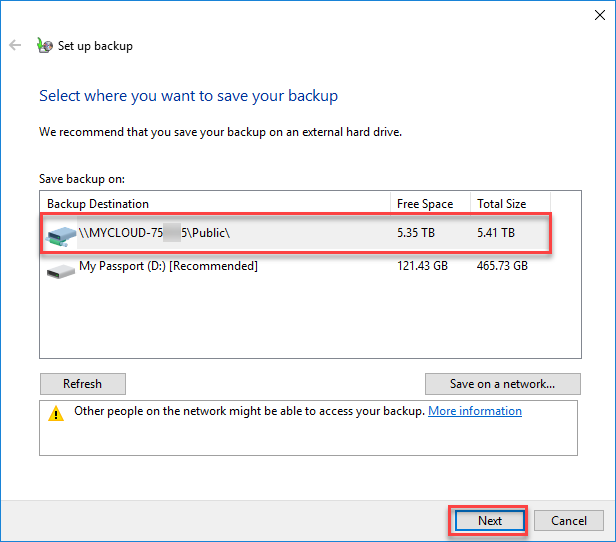
- A list of Backup Destinations will appear, displaying the local drives. Click on Save on a network... option to look for the WD Network Drive.
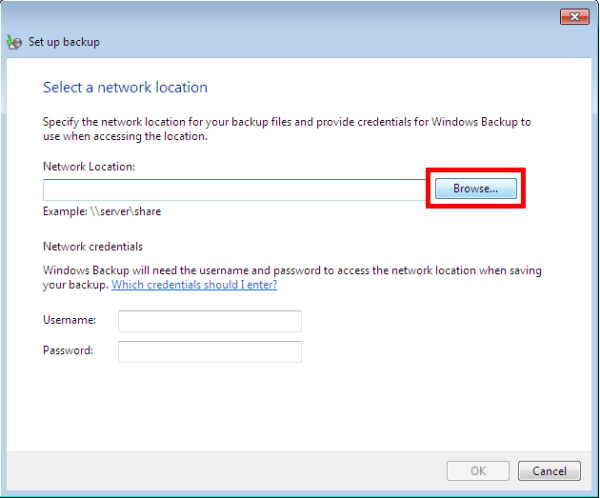
- Click on Browse to look for an available share.
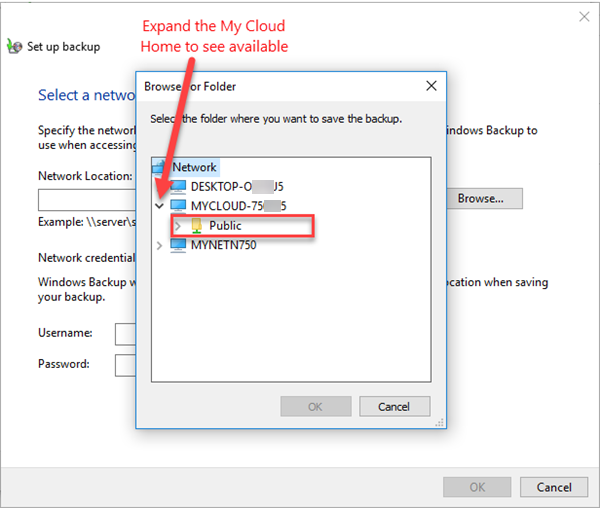
- On the Browse for Folders window, expand the MYCLOUD-XXXXXX to display the available shares. Select the desired share and click on Ok.
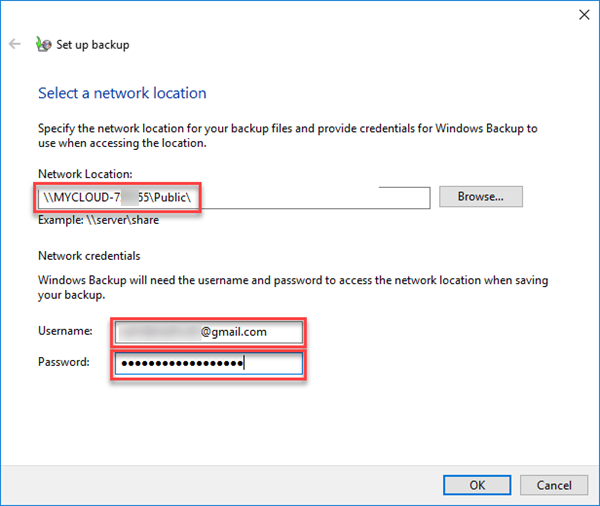
- Once the destination share is selected, input the necessary credentials (username and password) to provide Windows with the necessary access to the network share. Once done, click on Ok.
- Now, the My Cloud should have the selected share available in the Backup Destination window. Select that share and click on Next.
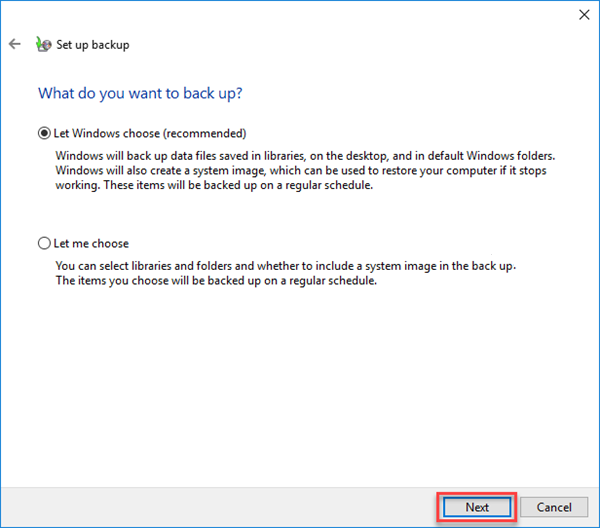
- Next, Windows will allow for a user to either select the contents that are to be backed up, or provide an option for Windows to select the backup's content. Select the desired method and click on Next.
- Review the items that are to be backed up, and when satisfied with the backup's content, click on Save settings and run backup.
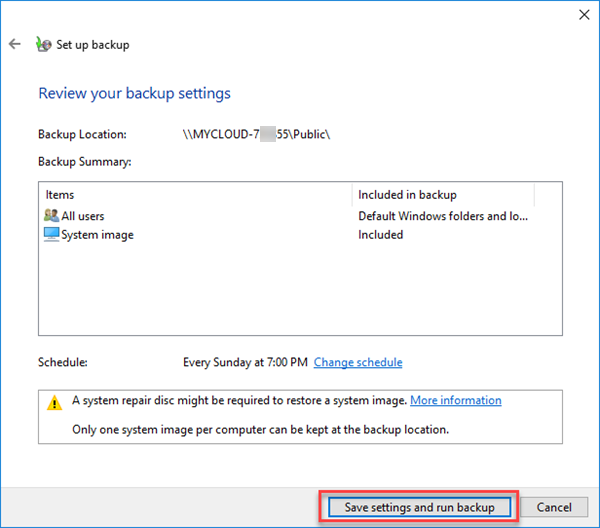
Initially the backup will be performed on a weekly basis. Click on Change Schedule to see more options on when the backup is to be performed.

- The backup will immediately start and a backup progress bar will display for the duration of the operation. This process may take several hours to complete.
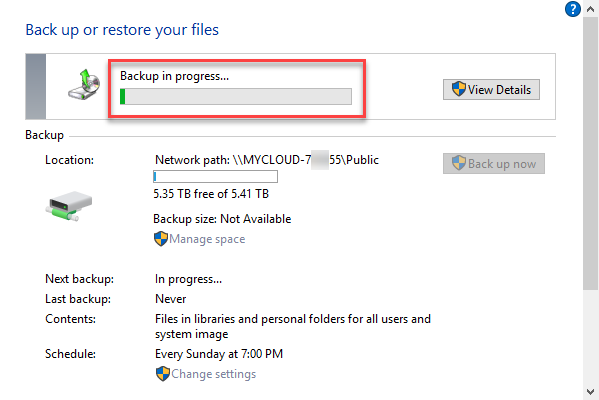
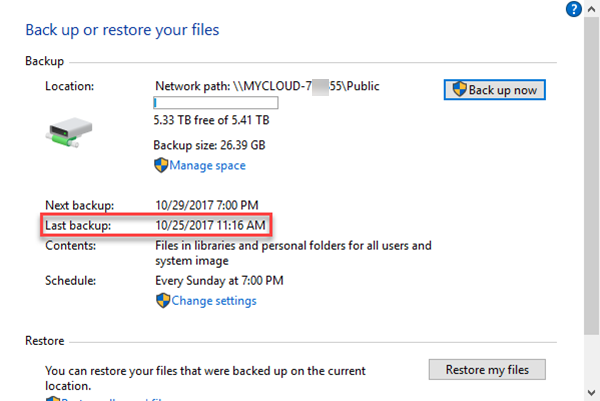
- Once completed, the backup area will display the both the last time the backup was made, as well as the next backup's date.
macOS Time Machine
Time Machine is a built-in utility within macOS that is used to backup files onto an external or network drive.
Supported OS Versions
Time Machine on My Cloud Home is supported on macOS versions listed below:
IMPORTANT:The macOS version MUST support SMB protocol.
To learn more about Time Machine and SMB, please see Apple Article ID HT202784: Backup disks you can use with Time Machine.
- macOS 13 Ventura
- macOS 12 Monterey
- macOS 11 Big Sur
- macOS 10.15 Catalina
- macOS 10.14 Mojave
- macOS 10.13 High Sierra
macOS Updates
Please update the version of macOS being used to the latest release.
For assistance with updating macOS please see Apple article HT201541: Update the software on your Mac
My Cloud Home TimeMachineBackup Share
- My Cloud Home TimeMachineBackup is a local area network (LAN) public share and cannot be made private
- Encrypt Time Machine backups is supported and may result in slower Time Machine backup timies
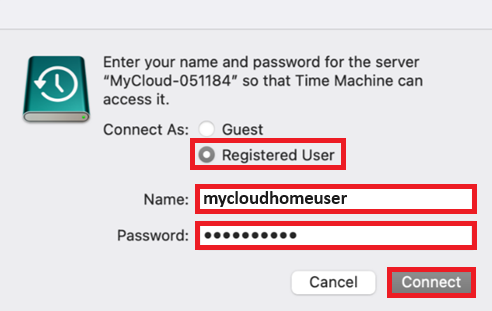
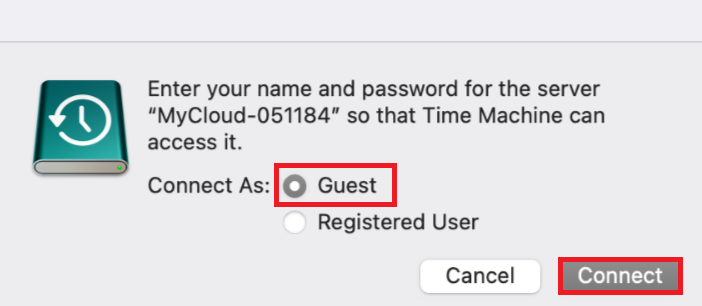
For more information regarding Encrypted backups, please refer to Answer ID 26160: How to Setup an Encrypted Time Machine Backup on macOS - When prompted, connect to the share as the macOS Guest user
- When prompted, connect to the share as macOS Registered user when local network access is enabled. For more information, please refer to Answer ID 34991: How to Enable Local Network Access to Data on My Cloud Home Using the Dashboard with Cloud Services
Time Machine Backup Procedure
View the Use of Third-Party Software or Websites disclaimer.
Western Digital Support cannot help with third-party software or hardware.
|
Western Digital is committed to providing our customers the best possible service and support. Time Machine is an Apple product and the best place to get support for using Time Machine is with Apple. In the event that Apple is unable to resolve your issue or determines that the issue is caused by a problem with the drive WD can assist with replacing the drive and diagnosing issues with the device. For assistance replacing the device, please see Answer ID 10336: Steps to Get a Warranty Replacement, Power Supply, or USB Cable |
Please click on the links below to go to backup or restore section of the article
How to backup and How to restore
How to Backup
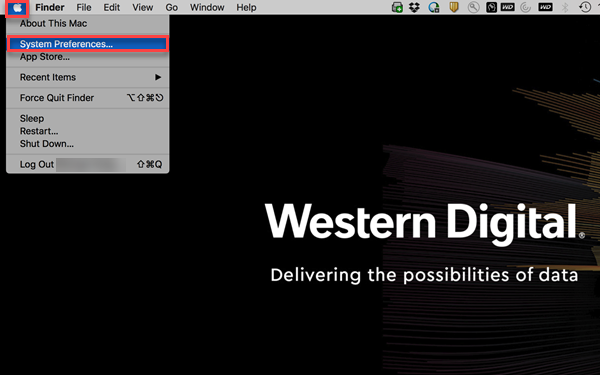
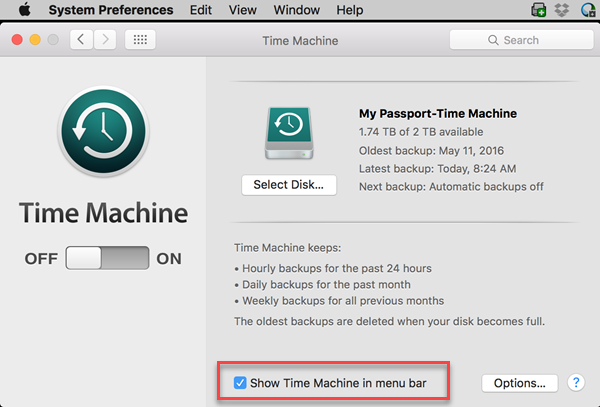
- Click on Apple icon and choose System Preferences
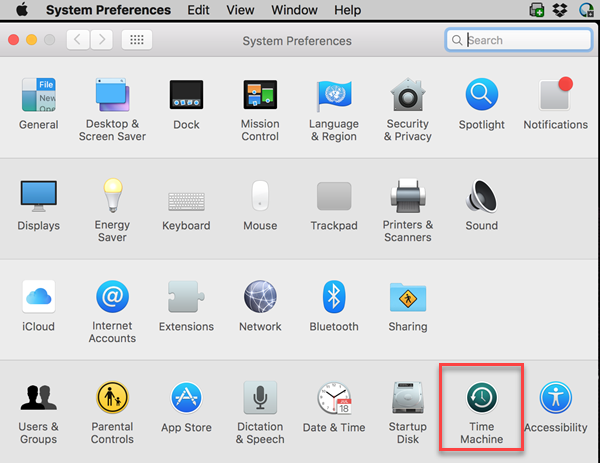
- Open Time Machine
- Make sure Show Time Machine in menu bar is enabled so it can be accessed from the menu bar
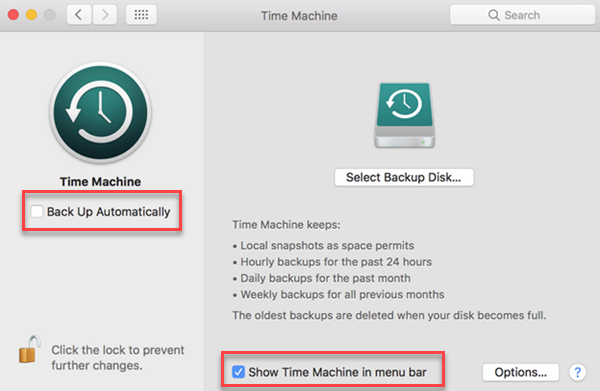
- Please note that the ON / OFF switch has been changed to Back Up Automatically on macOS 10.12 (Sierra)
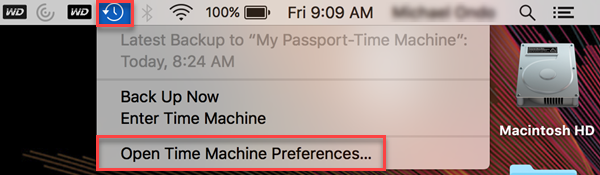
- Click the Time Machine icon from the menu bar and go to Open Time Machine Preferences
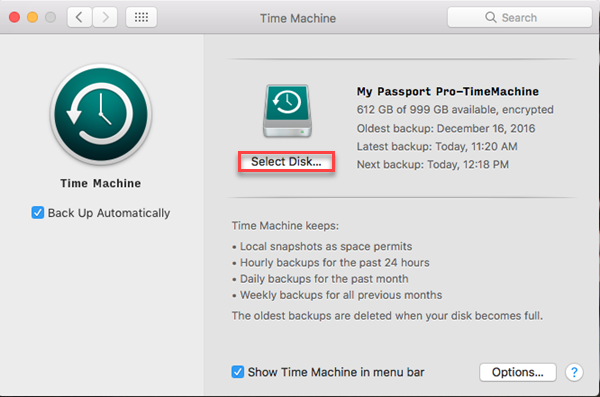
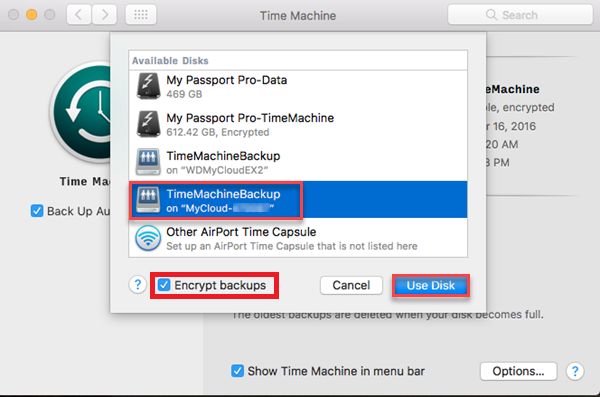
- Choose Select Disk
- From the list of available drives
- Click TimeMachineBackup/TimeMachine on MYCLOUD-XXXXX (drive's name)
- Check the box next to Encrypt Backups to encrypt the Time Machine backups
For more information regarding Encrypted backups, please refer to Answer ID 26160: How to Setup an Encrypted Time Machine Backup on macOS - Click on Use Disk
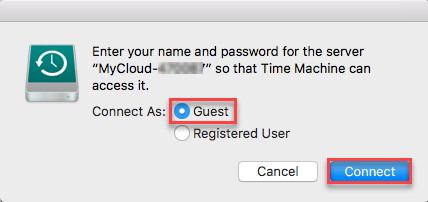
- Choose Guest or Registered User and click Connect to continue
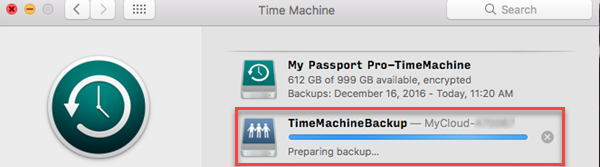
- Wait for the Time Machine to configure and start the backup
- Allow the backup to run which may take several hours
- Once the backup is completed, the date and time of the latest backup will be displayed in the Time Machine panel along with the date and time of the next backup
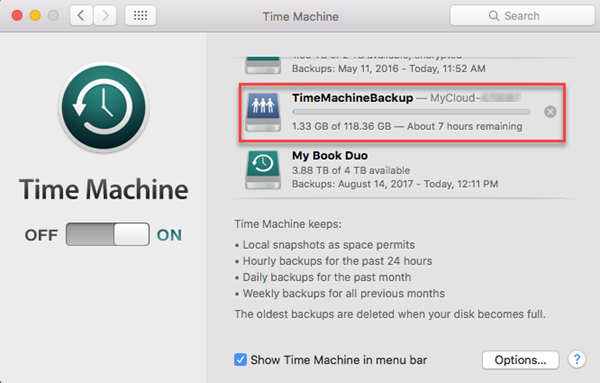
An alert popup may be displayed indicating the Time Machine backup as completed. Click Close

How to restore
For additional information regarding macOS Recovery and Migration Assistant, please refer to Apple article HT201250: Use Time Machine to back up or restore your Mac
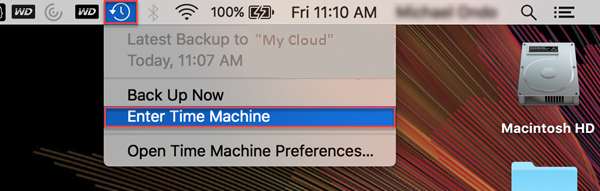
- Click the Time Machine icon in the menu bar and choose Enter Time Machine
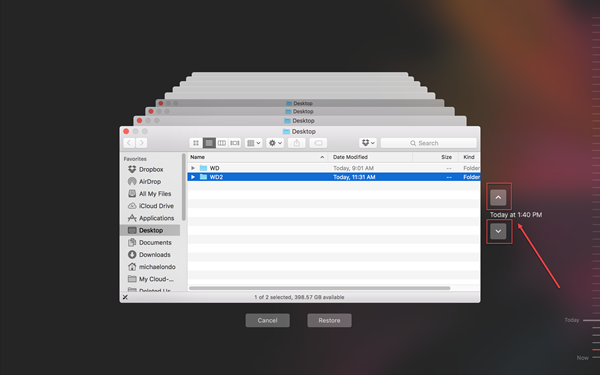
- Select the date and time to restore from
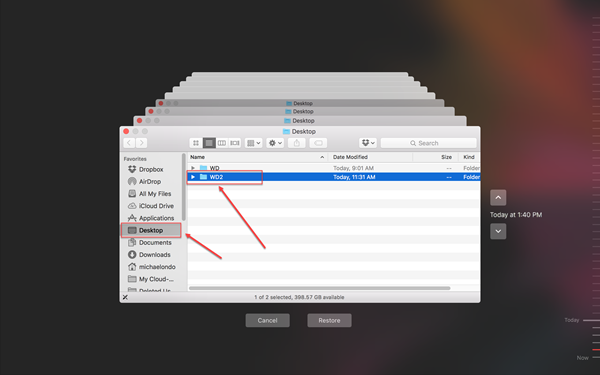
- Choose the files or folders to restore
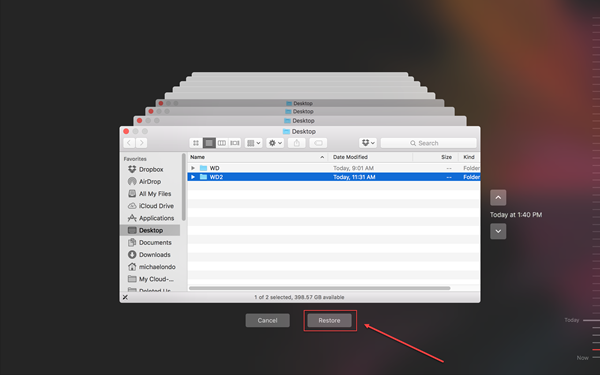
- Click on Restore
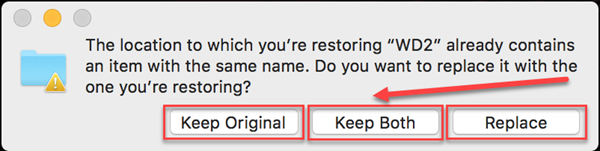
- If the files already exist on the Mac, choose Keep Original, Keep Both, or Replace
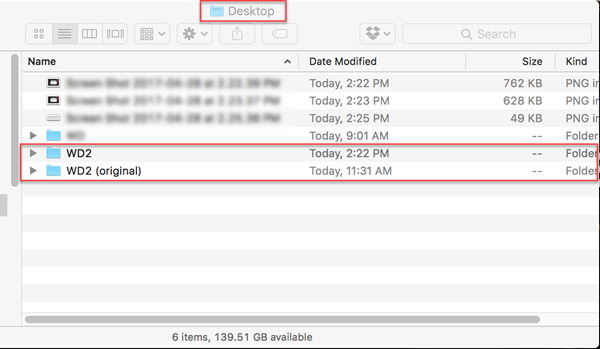
- Open the restore location (Desktop, Documents, etc.) to view the restored folders and files
Alternate 3rd Party Backup Software
View the Use of Third-Party Software or Websites disclaimer.Western Digital Support cannot help with third-party software or hardware. IMPORTANT:
Western Digital does not provide installation, configuration, troubleshooting or technical support for 3rd party, partner, or vendor products.
WD Community Forum members suggested or recommended backup software.
| Acronis True Image (WD NAS Promo) |
| Cobian Backup |
| EaseUS Todo Backup |
| FreeFileSync |
| Macrium Reflect Free |
| Paragon Backup and Recovery |
Backup Troubleshooting and Solutions
Knowledge Base articles related to network attached storage backup issues.
| Environment | Answer ID | Description |
|---|---|---|
| My Cloud Home | 20412 | My Cloud Home Not Detected or Not Found by Windows or macOS Computer/td> |
| My Cloud Home | 19522 | How to put a My Cloud Home in Port Forward Mode |
| My Cloud Home | 18913 | Desktop App Mounted Drive is Not Accessible in Windows Network or macOS Finder |
| Windows | 20136 | Windows Backup Configuration Message "The Specified Network Location Cannot Be Used" |
| macOS | 18905 | TimeMachineBackup and Public Share are not accessible from the My Cloud Home Mobile, Web or Desktop App |
| macOS | 9531 | Error: 'Time Machine could not complete the backup.' occurs when backing up to the Time Machine share |
| macOS | 9908 | Time Machine backup takes a long time to complete |
| macOS | 15033 | Time Machine Must Create A New Backup For You |
| Network | 17243 | Common Causes and Solutions of Slow Backups |
| Network | 17562 | Common Causes of Files Not Being Backed Up |
| Network | 18626 | Common Causes and Solutions for Slow Network Data Transfer Speeds |