Apple File Protocol (AFP) is no longer supported on My Cloud OS 5 firmware 5.19.197 and My Cloud Home firmware 7.16.0-217 and higher.
Description
Time Machine cannot complete an initial backup and alerts with an error:
- Time Machine backup failed
- Time Machine could not complete...
- The computer entered sleep mode during the initial Time Machine backup.
- The destination disk becomes unavailable.
- The destination disk does not have enough free space to contain the Time Machine backup.
- The Time Machine Backup Maximum Size is not set to the default of 100% for the 1st backup.
- The Time Machine Backup Maximum Size is set to a value lower than what Time Machine requires.
- My Cloud OS 5: SMB Protocol was changed from the default: SMB2,SMB3 and NTLMv2.
IMPORTANT: For more information please also see: HT204157: If you can't back up or restore your Mac using Time Machine
Time Machine backup takes a snapshot of the macOS system, at that point in time. This includes system settings and program files, along with the user’s profile settings, installed programs, and saved documents. The initial Time Machine backup can be several hundred Gigabytes of data; and can take several hours to complete. It is important to understand, any interruption in the initial backup will cause Time Machine to start over. The Time Machine backup, and its backup.backup.db file is incomplete and unusable until Time Machine cleans up the cached working data and closes the file on the destination disk.
Resolution
| Adjust macOS energy Saver Preferences | Click here for Instructions |
| Time Machine Maximum Size | Click here for Instructions |
| My Cloud OS 5 SMB Protocol | Click here for Instructions |
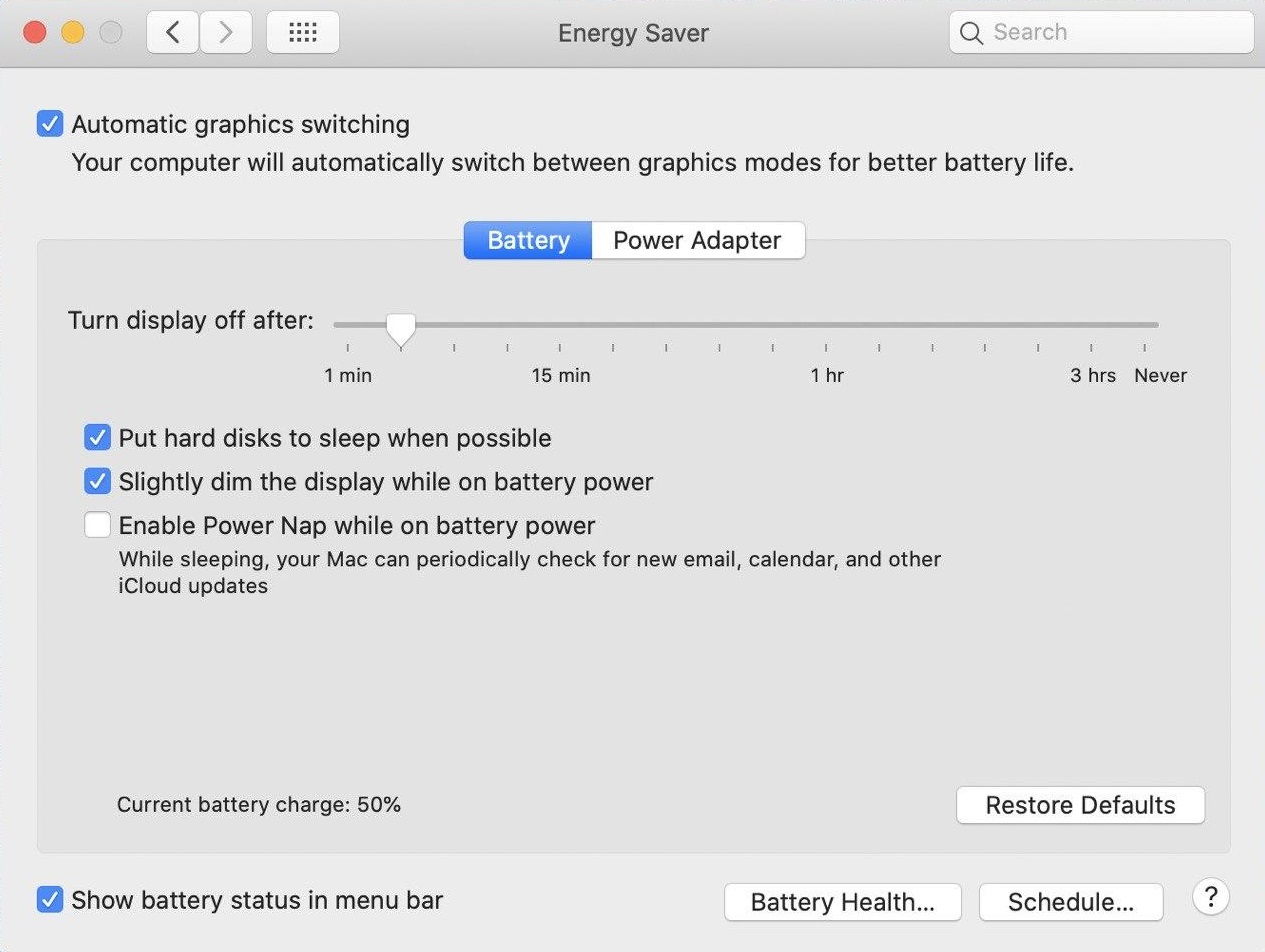
Adjust macOS energy Saver Preferences
- Prevent the computer from entering sleep mode.
- Adjust the macOS System Preferences – Energy Saver settings prevent the computer from entering sleep, keep the hard drives awake, and/or allow Time Machine to use network resources when needed. Please see: HT202824: Use the Energy Saver settings on your Mac for instructions on accessing the System Preferences to adjust Energy Saver settings on a macOS computer.
- Un-check the box next to: Put computer to sleep when possible; or, Check the box next to: Prevent computer from sleeping automatically when the display is off.
- Un-check the box next to: Put hard drives to sleep when possible; or, Check the box next to: Prevent the hard drives from sleeping.
- Check the box next to: Enable Power Nap while plugged-in to a power adapter. Best practice, use the power adapter (Laptop models) during the initial backup.
- Prevent the hard drive from entering sleep mode or becoming unavailable.
- Some advanced external hard drives, like our older My Passport and My Book drives, include a configurable sleep timer. Best practice, for the initial Time Machine backup, is to temporarily disable the drive’s sleep timer. This can be re-enabled again after the initial backup successfully completes.
- Network Attached Storage (NAS) drives also have sleep timers; and may or may not allow the disk to enter sleep mode while Time Machine is writing to a share. It is equally important to ensure the Ethernet pathway between the computer and the destination share is kept connected. Best practice, is to ensure the NAS’s firmware is up to date and prevent the device from entering sleep while Time Machine completes its initial backup.
- Ensure the target or destination disk has enough free space to contain the Time Machine backup. Good practice is to use a disk with at least as much free space as the total volume of the mac-HD disk. Best practice is to use a disk that is at least twice as large as the total capacity of data currently stored on the mac-HD. This will allow Time Machine to function properly for several years.
 |
Laptop computer owners: It is important to keep the lid open. Closing the lid on a laptop computer will override all Energy Saver settings; and shut power to the USB and Ethernet ports, Wi-Fi adapter, and force the computer and hard drives to sleep. Connect the power adapter to the computer while the initial Time Machine backup is running, to prevent the battery from draining and shutting down the computer. |
The Energy Saver settings can be changed back to their factory default values when the Time Machine completes the initial backup. Each subsequent incremental backup would only be a gigabyte or so; and would only run for a few minutes. Any interruption in an incremental backup will just be "caught up" with the next scheduled Time Machine backup.
The Energy Saver settings can be changed back to their factory default values when the Time Machine completes the initial backup. Each subsequent incremental backup would only be a gigabyte or so; and would only run for a few minutes. Any interruption in an incremental backup will just be "caught up" with the next scheduled Time Machine backup.
ISSUE:
Time Machine couldn't complete the backup to "MyCloudpr2100.local". The network backup disk does not support the required capabilities.
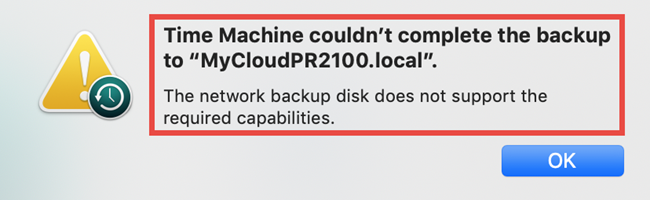
SOLUTION:
- My Cloud OS 5 SMB Protocol needs to be set to SMB2, SMB3, Please refer to Answer ID 29958: How to Change Windows Samba (SMB) Protocol Version on My Cloud OS 5.
ISSUE
Time Machine Backup failed.

Time Machine Backups can fail under the following conditions:
- The value of Time Machine Backup Maximum Size is not set to the default of 100% for the 1st backup.
- The value of Time Machine Backup Maximum Size is not set to low for subsequent backups.
SOLUTION:
Ensure the Time Machine Backup Maximum Size is set to the default of 100% for the very 1st time machine backup and high enough for subsequent backups.
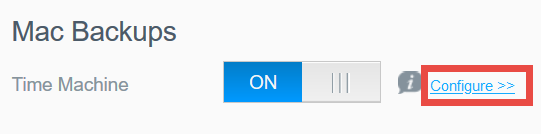
- Access the My Cloud OS 5 Dashboard, please refer to Answer ID 29818: Steps to Access the Dashboard of a My Cloud OS 5.
- Click Settings
- From the Settings column, click General.
- Scroll down and click the Time Machine Configure Settings.
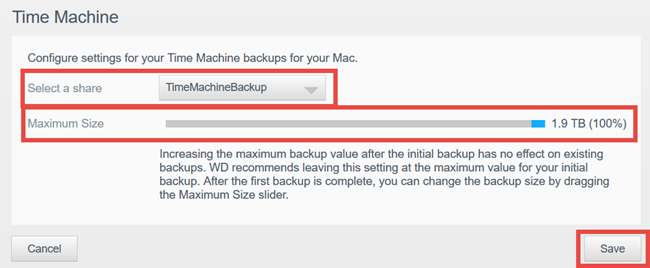
- Ensure the share is set to the default TimeMachineBackup share.
- Ensure the Time Machine Backup Maximum Size is set to the default of 100% for the 1st backup and high enough for subsequent backups.
- Click Save.