Español | Français | Italiano | Deutsch | Русский | Português | 简体中文 | 繁體中文 | 한국어 | 日本語
Software Download
- Steps to Install on Windows
- Steps to Install on macOS
- Introduction
- Update WD Discovery
- Install and Open WD Apps (WD Security, WD Drive Utilities, Acronis Backup)
- Update WD Apps
- Access Files on the Drive
- Set a Password & Unlock a Supported WD Drive
- Configure RAID Mode on Supported WD Drives
- Install Paragon Driver on Windows & macOS
- Turn on / off UAS (USB Attached SCSI) on My Passport SSD / Go
- Turn Off Notifications, Stop on System Startup, & Unpin Menu Bar
- Eject & Turn LED On or Off
- Icon States
- Register a Drive
- Provide Feedback
Need more help?
- Answer ID 29475: WD Discovery Release Notes
- Answer ID 3446: Supported Apps, Operating Systems, File Systems and Languages on WD Discovery
- Answer ID 12713: Third-Party App Import Content from Cloud Storage or Social Media Account on WD Discovery
- Answer ID 4158: Steps to Uninstall and Remove WD Discovery on Windows and macOS
- Answer ID 23022: Solutions & Troubleshooting for WD Discovery Online User Guide
Download and Install on Windows
- Download WD Discovery.
- Unzip the Install_WD_Discovery_for_Windows.zip.
- Run as Administrator.
Click Yes. - Click Install Now.
- Reboot.
- Need more help?
Answer ID 12455: Cannot Find USB Flash, NAS, External or Internal Drive on Windows or macOS
Download and Install on macOS
- Download WD Discovery.
- Unzip the Install_WD_Discovery_for_MAC.zip.
- Open Install WD Discovery.
- Click Open.
- Click Install Now.
- Enter the macOS user password.
Click OK. - Reboot.
- Need more help?
Answer ID 12455: Cannot Find USB Flash, NAS, External or Internal Drive on Windows or macOS
Introduction
Supported Drives
WD Drive, WD Drive Plus, My Passport works with USB-C, My Passport SSD, My Passport SSD, My Passport, My Passport for Mac, My Passport Go, My Passport Ultra (USB-C), My Passport Ultra for Mac (USB-C), easystore Portable Storage, WD Backup Drive Desktop, WD Elements SE, WD Elements SE SSD Portable Storage, My Book, My Book Duo, easystore Desktop Storage
Need more help?
Answer ID 6488: WD Discovery Supported USB Drives
WD Discovery Features
- Manage drives in one app.
- Password protect supported drives.
- Manage RAID on supported drives.
- Get notifications for updates and unregistered drives.
- View drive status such as capacity and free space.
- Transfer data from cloud storage to drives.
- Access and update installed apps.
- Set preferences for startup and window display.
IMPORTANT:
An active internet connection with opened port 80 and 443 are required to update the apps.
View the Use of Third-Party Software or Websites disclaimer.
Western Digital Support cannot help with third-party software or hardware.
Update WD Discovery
Update with Internet Connection
- WD Discovery will update automatically.
- macOS users needs to enter admin password for WD Discovery Updates.
- A reboot may be required before or after an update to WD Discovery to complete the process.
Click Restart Now at the prompt after the update process.
Update without Internet Connection
Need more help?Answer ID 2802: Download and Install WD Discovery With Restricted Internet Connections.
Install and Open WD Apps
Install WD Security and WD Drive Utilities
- Open the WD Discovery
Click Apps tab. - Click Install under the WD App.
- WD Discovery installs the WD App automatically.
- Click Open.
- Repeat the steps above to install other Apps.
Install Acronis True Image
Acronis True Image for Western Digital needs to be installed outside of WD Discovery.
Need more help?Answer ID 32077: Instructions to Install Acronis True Image for Western Digital in WD Discovery
Update WD Apps
- Open WD Discovery
Click Apps tabs. - Click Update.
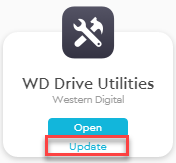
- Click Open.

-
The WD App update is installed by WD Discovery.
-
Apps that have an update will have an Update button.
-
The app might take a moment to start.
-
Access Files on the Drive
Access Drive Content on Windows
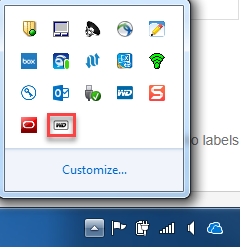
- Locate the WD icon in the Windows system tray.
Click to start WD Discovery.
- Double-click the drive.
Access Drive Content on macOS
- Click the WD icon on the macOS menu bar.
- Double-click the drive.
Set a Password & Unlock a Supported WD Drive
- Click the Gear icon.
Click Set Password.
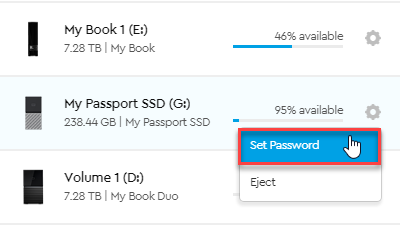
- Type the Password, Verify Password, Password Hint.
Click Set Password. - Safe Eject the drive.
Need more help?
Answer ID 21880: Steps to Safe Eject and Remove USB Flash and External Drives on Windows or macOS
- Disconnect and reconnect the cable.
- Click Unlock.
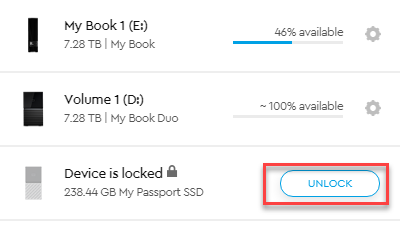
- Type the Password.
Click Unlock Device. - Double-click the drive.
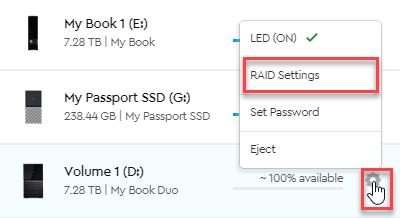
Configure RAID Mode on Supported WD Drives
Check the RAID Mode on the supported drive.
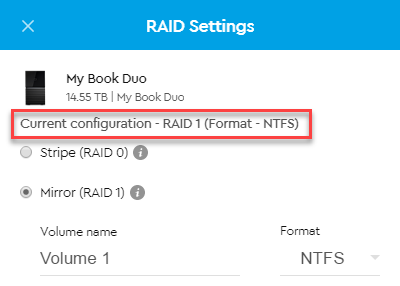
Change RAID Mode
- Click the Gear icon of the supported drive.
Click RAID Settings.
- Click RAID.
Type a Volume name.
Click Format.
Click Configure.
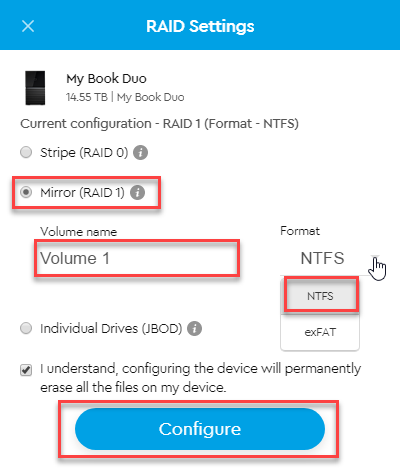

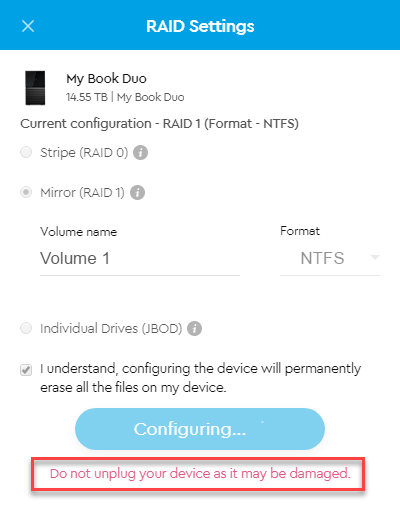
Critical:
DO NOT unplug the drive as it may be damaged.
Wait for the RAID configuration process to complete.
Install Paragon Driver on Windows and macOS
- macOS can read external drives setup as NTFS but can't write to them.
- Windows can't read and write to drive setup as HFS+.
- Format the external drive with exFAT to use on macOS and Windows.
Need more help?- Answer ID 50276: Format USB Flash and External Drive as exFat using macOS for use on macOS and Windows Guided Assist
- Answer ID 50277: Format USB Flash and External Drive as exFat using Windows for use on Windows and macOS Guided Assist
- Answer ID 31109: Steps to Install Paragon HFS+ Driver on Windows for SanDisk Professional and WD External Drives
- Answer ID 34871: Steps to Install Paragon NTFS Driver for macOS for WD and SanDisk Professional
View the Use of Third-Party Software or Websites disclaimer.
Western Digital Support cannot help with third-party software or hardware.
Supported Products
|
|
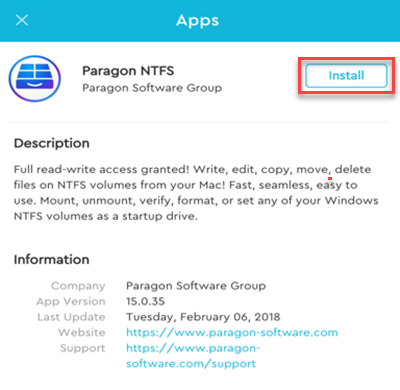
- Open WD Discovery
Click on Install Driver.
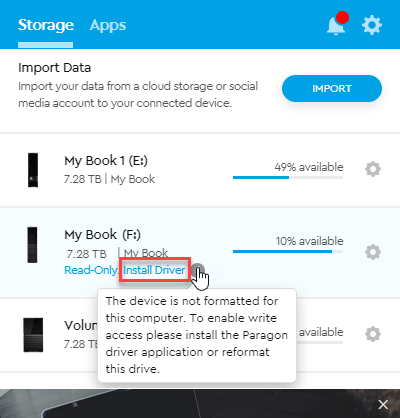
- Click Install.
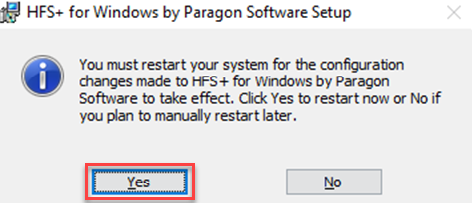
- Click Yes to restart the computer.
Turn on UAS (USB Attached SCSI) on My Passport SSD & My Passport Go
USB Attached SCSI (UAS or UASP) is a protocol that uses SCSI commands over USB and this setting will provide faster transfer speeds.
Supported Drives
- WD My Passport SSD (WDBAGF, WDBKVX)
- WD My Passport Go (WDBMCG)
Supported Operating Systems
- Windows 8 and higher
- macOS 10.8 (Lion) and higher
Steps to enable UAS or UASP
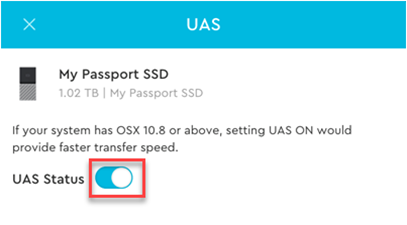
- Click the Gear icon.
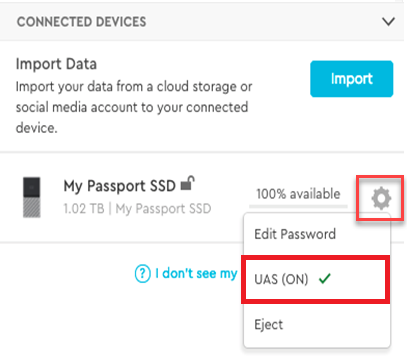
- Toggle UAS Status to ON.
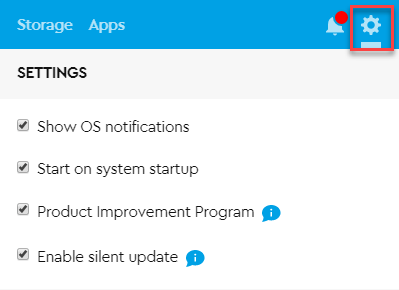
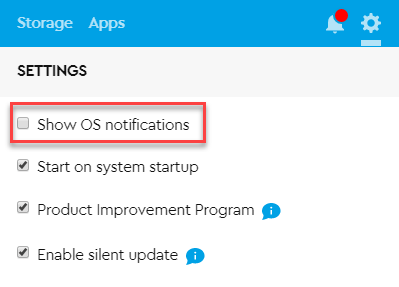
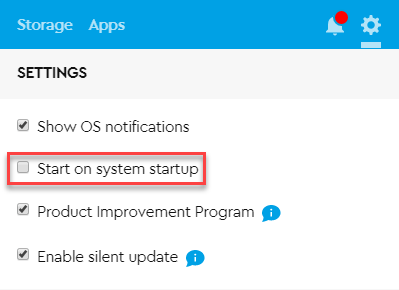
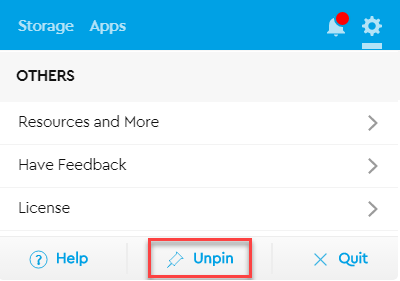
Turn Off Notifications, Start on System Startup, & Unpin from Windows System Tray & Apple Menu Bar
- Open WD Discovery.
Click the Gear icon.
- Uncheck Show OS notifications.
- Uncheck Start on system startup to stop Start on startup.
- Click the Unpin to move the WD Discovery window around.
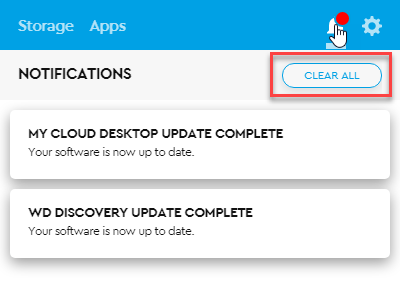
- Click on Bell icon.
Click on Clear All.
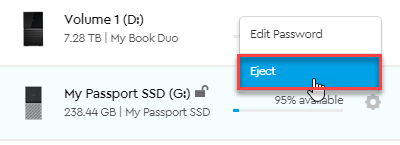
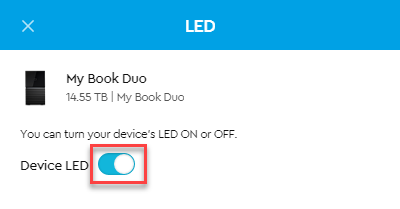
Safe Eject & Turn LED On or Off
How to Safe Eject
- Click on Gear icon.
Click Eject.
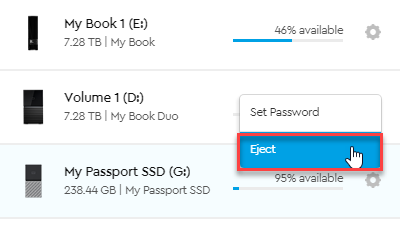
- Disconnect the drive once no longer seen in WD Discovery.
Steps to Turn LED On or Off
- Click the Gear icon.
Choose LED.
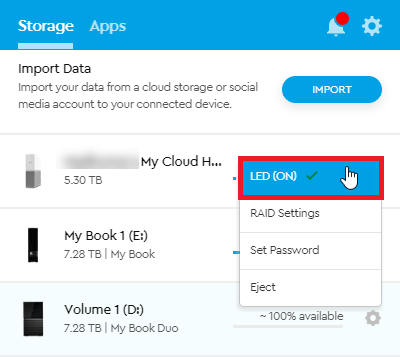
- Toggle LED switch to ON or OFF.
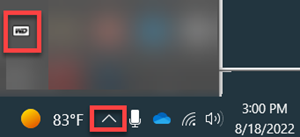
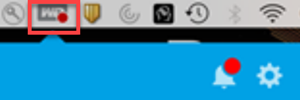
WD Discovery Icon States
The WD Discovery icon is visible in the system tray.
- The icon can be visible by default:

- Or visible once opening the arrow:

Windows and macOS have the following four states.
 Default State.
 Selected State - When the system tray icon is clicked.
 Activity In Progress - downloading software.
 Critical Notification - An error within WD Discovery.
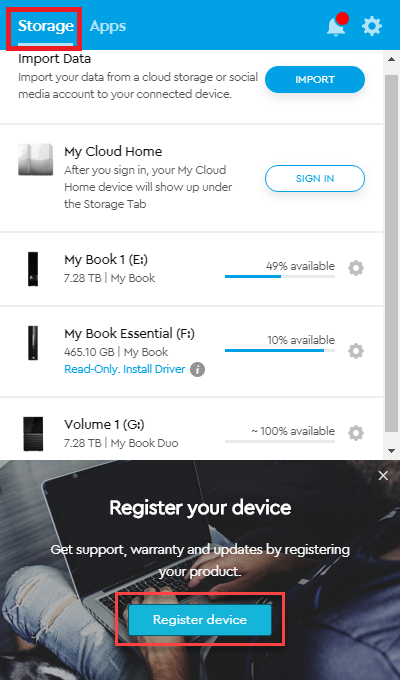
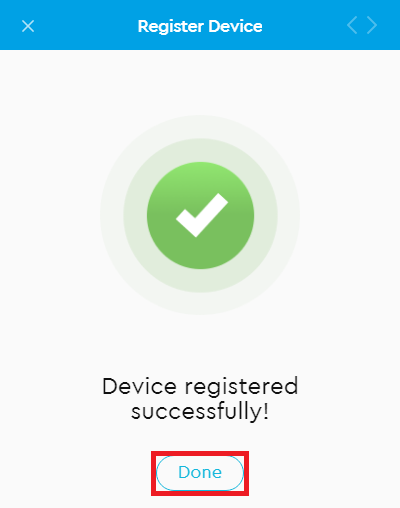
Register a Drive
- Open WD Discovery.
- Click Storage tab.
- Click on Register device.
-
- Enter First Name, Last Name, and Email.
Select the Country.
Click Register device.
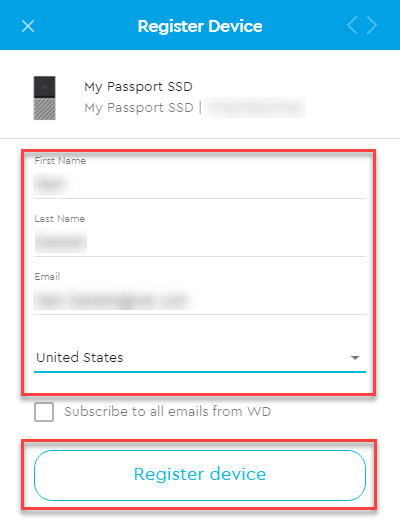
- Click Done.
Provide Feedback
- Open WD Discovery.
- Click the Gear tab.
- Click Have Feedback?
- Enter Email Address and Comments.
- Click SEND FEEDBACK.
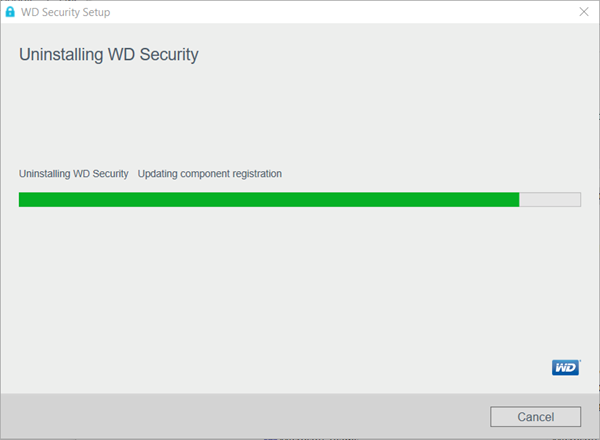
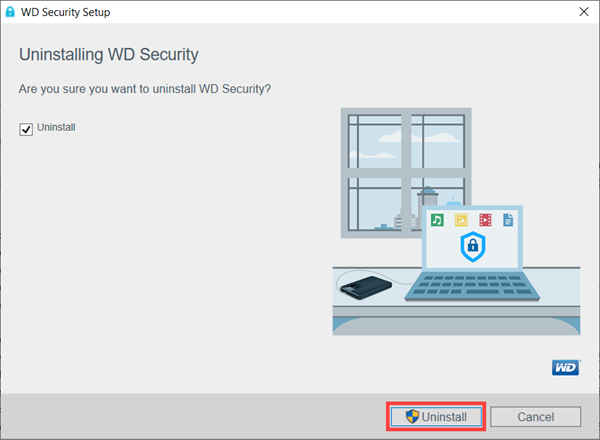
Steps to Uninstall WD Apps
macOS
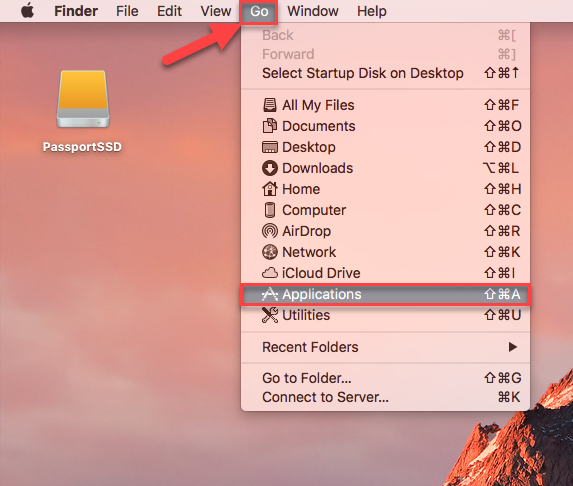
- From Apple menu bar, click on Go and open Applications.
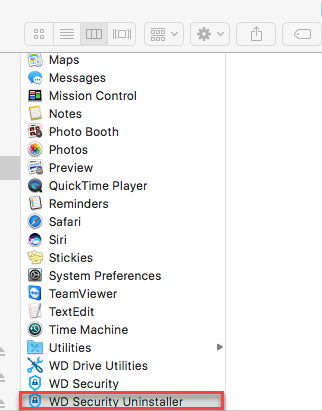
- Go to the WD App Uninstaller (WD Security Uninstaller, etc.) and run the uninstaller.
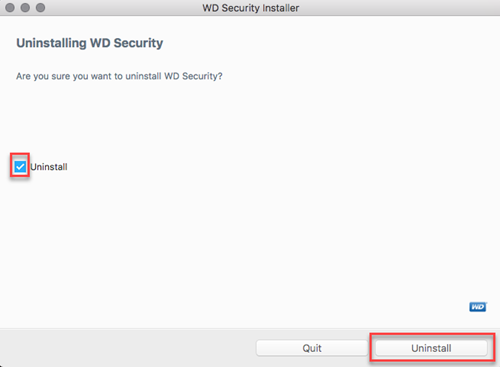
- Check the box and click Unistall.
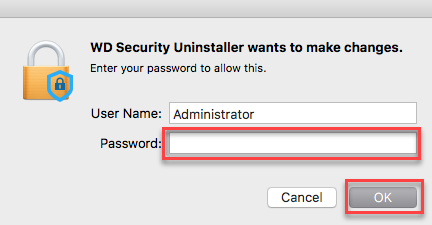
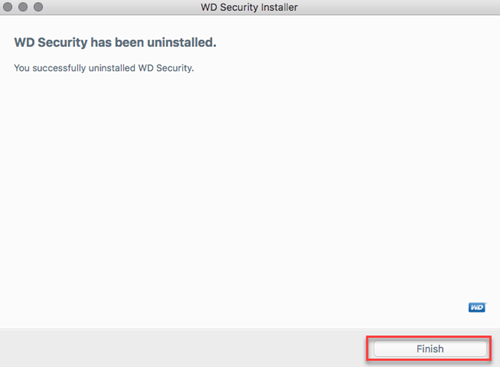
- Enter the macOS user password and click OK and wait for the uninstaller to complete.
- Click Finish once the app has been successfully uninstalled.
PC:
IMPORTANT:
Steps and screenshots may vary based on the version of Windows being used.
For more information on how to access the Control Panel please refer to the Microsoft Article 13764.
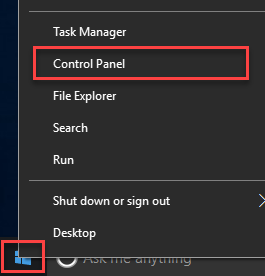
- Right click on Windows Start button and go to Control Panel.
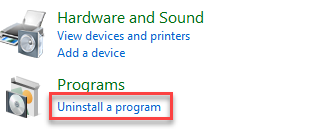
- From the Programs choose Uninstall a program.
- Right click on WD app from installed programs and choose Uninstall.
- Check the box and click the Uninstall button.
- Wait for the app to be uninstalled.